
The Fisher Gold Bug Pro is still my favorite detector for hunting small gold nuggets in locations with exposed bedrock and shallow soils.
When used properly, this detector is deadly when hunting in this type of environment. It operates smoothly and senses the smallest nuggets, while handling mineralized ground quite well for a VLF detector.
I also like to recommend the Gold Bug Pro to beginners for its simplicity. If there has ever been a “turn on and go” detector for gold hunting, this is it. Unlike some detectors with numerous toggles, buttons, and switches, the Gold Bug Pro has just two knobs, buttons to ground balance, and an LCD screen.
With just a short time using this sweet little detector, even a beginner is ready to find gold with it.
Here are a few tips and settings that I use when hunting with my Gold Bug Pro. There isn’t much to experiment with on this detector. You basically get it setup and you are ready to hit the goldfields!
1. Turn on/Set the Gain
The knob that you use to turn on the detector is the same as you use to adjust the gain on the Gold Bug Pro. Turn the knob to the right so the detector turns on. Wait a few seconds and then turn the dial up to the 10 o’clock position.
This is where most people make the mistake of turning the gain all the way to the right, assuming that that gives them maximum depth of detection. Not so! What you will get instead is a chattering, unstable detector that will sound off constantly, making it very hard to differentiate between a gold nugget and ground noise.
You want to turn the gain up only as high as you reasonably can while still maintaining a smooth threshold. I rarely turn the knob past the 12 o’clock position, and usually am operating around the 10 or 11 o’clock position, and I rarely vary outside of that range. This is where I have found to be the optimal setting in almost all areas that I have used the Gold Bug Pro.
2. Disc or All-Metal Mode
This setting is simple. You want to use All-Metal mode in most gold hunting situations. Turn the knob just enough that you have a nice consistent threshold.
Using any type of discrimination with a gold detector is risky, as you are likely to get signals indicating that gold is a trash target and you could miss it. You could write a lot about the reasons that discrimination doesn’t work very well for gold hunting, but suffice it to say that if you rely on a discrimination setting to determine which targets to dig, you will be missing gold. You are much better to rely on the sound and visual indicators on the LCD screen than then you are to try and disc out the sounds of trash.
In my opinion, the ONLY time to use the discrimination setting on the Gold Bug Pro is when you encounter an area that is simply too trashy to hunt, and you would otherwise bypass it for cleaner ground. In these extremely trashy locations that are heavily littered with old iron rubbish like square nails, you can disc them out so that you can pick out the non-ferrous targets from the ferrous trash. Just realize that you WILL miss pass over some gold nuggets doing this.
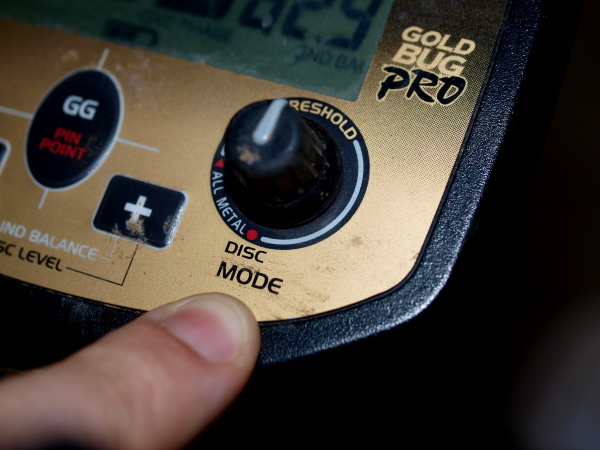
3. Ground Balance
You ground balance the Gold Bug Pro similar to how you do with most detectors. Press the Ground Grab button (GG) in the center of the display and hold it down while pumping the coil over the ground. Look at the ground balance number on the LCD display and pump the coil until the number levels out. At the same time you will notice that the threshold smooths out. Release the GG button and you are ready to start detecting.
4. Understanding the LCD Display
Lots of gold prospectors only rely on the sound of their detector to indicate whether or not they dig the target, and they dislike detectors with a visual display screen like the Gold Bug Pro. My question would be, why not use these additional tools at your disposal?
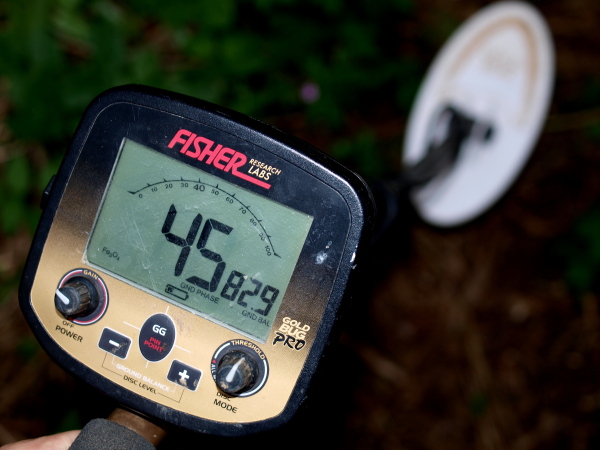
There are 3 different visual indicators on the LCD screen of the Gold Bug Pro, and by evaluating all of them you can get a pretty good idea of the type of target is under the ground.
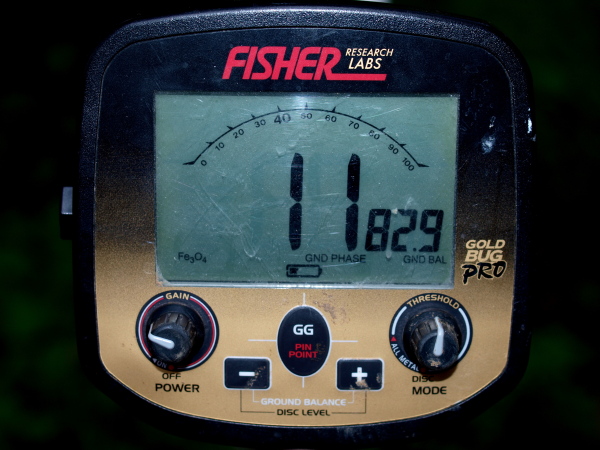
Iron ID bar
On the left side of the display is the Iron ID bar. This is an indicator that evaluates the chances that the target is made of iron (trash target). There are 7 bars in total, and most of the time a gold nugget will register only 1 or 2 bars. Any higher than that is likely iron, although big nuggets might also register higher.
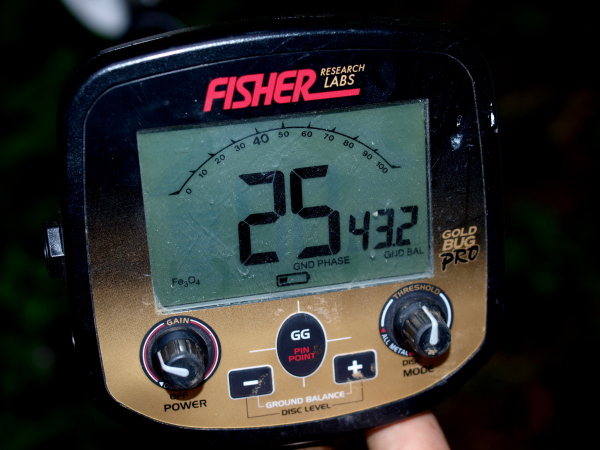
Ground Phase
The large number in the center is the Ground Phase number, which takes a reading of the soil immediately beneath the coil. During regular searching, this number should be similar to the Ground Balance number that you locked in with the Ground Grab button when you ground balanced. If the number is noticeably different while you are searching, you should probably re-balance your detector.
Read: How to Set Up Your New Gold Detector
Different types of targets will show different numbers on the Ground Phase number. I have noticed that iron nails will consistently register a number below 20. If the number remains low and consistent when sweeping the coil over top the target, generally I will move on and not dig. If the number is bouncing all over the place, this usually indicates an odd shaped target, sometimes thin metal or wire will do this. It’s usually best to dig these targets, since it could be gold.
If you get a high number on that reading you will want to dig it. Especially if the number is above 35 or so.
Target Scale
The arc across the top of the display is yet another indicator that will give you a reading on the target. Iron will show to the left of the arc, gold generally toward the center, and coins like dimes, quarters, or silver will indicate to the right.
I have found that this scale is pretty darn accurate on gold, with smaller to medium gold nuggets consistently registering between 50 and 55 on this scale. If you get a target in that range it is definitely one to dig, it will almost always be either lead or gold. I always dig targets that are consistently above 35 on the target scale.
As with the other indicators, large nuggets will often fall outside of the “expected” range, usually giving a bigger number.
Buy a: Fisher Gold Bug Pro Metal Detector
Also Read: Nugget Hunting with the Garrett AT Gold
5. Choosing Which Targets to Dig
Here is where it gets tricky. Many gold hunters will tell you to ignore everything I just told you about target ID, and simply dig any and all targets that beep. And to be honest, that is pretty good advice. After all, you won’t miss any gold if you dig absolutely every piece of metal that you detect.
It’s your decision. I am perhaps one of the few gold hunters I know that will actually admit that I don’t dig all targets. And many of them don’t either, whether they will admit it or not. This is quite evident because I have found way too many old trash targets in so-called “worked out” goldfields to believe it.
The truth is that when you’ve been digging holes all day everybody gets sloppy. Especially in trashy areas, using a metal detector like the Gold Bug Pro will allow you to cherry pick targets and avoid a decent amount of iron trash.
Summary
The Gold Bug Pro is still my favorite VLF detector. I find it very simple to learn and use, and it is a great choice for beginners who have never detected for gold before. I highly recommend this detector to beginners and experienced prospectors alike.