
Gold panning is a really fun hobby that is enjoyed by people all around the world.
And it isn’t just hobbyists that use a gold pan to search for gold. Even experienced miners with a lifetime of experience with placer mining use them to quickly sample new areas and seek out concentrations of placer gold in creeks and rivers.
There is abundant information about gold panning on the internet… in fact, a while back we wrote this simple Step-by-Step Gold Panning Guide to help teach people the proper steps to use your pan.
However, we felt that a more expansive guide was needed to go beyond these simple steps in the gold panning process. There is a whole lot more involved in successfully finding gold than just using your pan properly.
Most of the people that go gold panning never find any gold. This is a fact. And their panning technique isn’t necessarily the problem… instead it likely has to do with the material that they are panning.
So let’s take a more in-depth look at successful gold panning so you can be sure to successfully find gold next time you go to your favorite river.

Choosing the Proper Gold Pan
First, let’s talk about the proper equipment, and of course the first thing you need is a good gold pan. There are lots of different pans out there, and all of them will work to varying degrees. After all, the panning process relies on gravity more to capture the gold, so theoretically ANY type of pan shaped object that had a low point would work to retain gold. In fact, miners during the early gold rushes in the 1800s used all sorts of homemade metal pans to get the gold.
Of course, today there are commercially produced gold pans that are do a really good job, and are a huge improvement when compared to what the “old timers” used back during the gold rush. And the first mass-produced pans were made of steel, which needed to be “cured” to remove factory oils before they could be used. Additionally, they would easily rust if not properly cared for.
A modern plastic pan has many advantages over the old metal pans that were popular years ago. The plastic gold pans that are made today are very durable, come in colors that contrast well with gold so that you can easily see the tiniest specks in the bottom of your pan, and they have built in riffles that aid in retention of the finest little bits of gold.
There are lots of good pans out there today, and one really good one is the Garrett Gravity Trap. It is my personal go-to pan for most situations. It is inexpensive and durable, and does a fantastic job of retaining fines.
Other Equipment to Have When You Start
To successfully pan for gold, you’ll need to carry more gear than just a pan. In fact, a good quality gold panning kit can really increase your odds of success when you start panning (This Garrett Gold Pan Kit has some good stuff to get you started).
You should still add a few more tools to your arsenal though if you want to be well equipped for a day on the river. Of course a good ol’ #2 shovel is a must-have item, and a smaller trowel sized shovel is also a pretty good idea.
Other good stuff to carry would be tweezers, magnifying glass, and a variety of crevicing tools that you can use to dig material out of cracks in the bedrock.
Crevicing tools don’t need to be store bought items specifically designed for prospecting; to the contrary, some of the handiest tools for this can be things like screwdrivers, thick pieces of wire, spoons, and pocket knives. The more variety you have, the better job you can do to get down to where to gold hides.
Where to Get Your Gravel
So what am I talking about when I say “where the gold hides?”
Well, I think most people know that gold is heavy; in fact it is generally the heaviest element that you will find in a river. What that means is that gold settles down, way down. And it settles in places where gravity allows it to.
Most of the gravel in that bar is barren and devoid of gold. Even if you are prospecting at a well-known gold-bearing river, the gold isn’t scattered around randomly, so if you simply dig a few shovelfuls of gravel from the top of a gravel bar and pan it out, you probably aren’t going to have any success.
Inside Bends and Behind Boulders
There are many places where gold can hide, but one universally understood truth is that gold will concentrate in “paystreaks” on the inside bends of rivers and streams. These are the areas where gravity allows the gold to settle.
Behind large boulders is another great place to get gravel to pan out. In the same way as inside bends, the slack water that is created behind large rocks and boulders can create conditions that placer gold can drop down and settle into the stream bed.
Boulders are great, but really any structure can have the same effect. For example, a seasonal logjam could easily create a similar environment where gold would settle.
Dig Deep and Clean out That Bedrock
 Most prospectors understand that inside bends and behind boulders are good places to dig. However, this is the point where LOTS of first time gold panners mess up.
They need to DIG DEEPER!
You know how gold settles to the bottom of your gold pan when you agitate it, right? Well the sands and gravel in a river or creek is doing this CONSTANTLY. The result is that as soon as gold finds a place where it settles, it starts to move downward in the strata of the gravel. It goes down, down, down, until it hits something hard enough to stop it. And this is generally bedrock.
Clean out those bedrock cracks. This is where those crevicing tools I mentioned earlier really come into play. Do your best to get down as deep as you can, because the highest concentrations of placer gold area going to accumulate at the very bottom of these cracks.
Oftentimes, it will be a thimbleful of material at the bottom of a bedrock crack that is richer than a hundred shovelfuls of gravel just a few feet above it.
You Should Spend Way Longer Getting Your Gravel than You Do Panning
Ultimately, I think this is the main reason that many prospectors will have a lack of success with gold panning. First-timers generally get excited to start finding gold, so they start digging indiscriminately all over the place, filling up their pan and going through the motions without actually seeking out the places where gold is most likely to be found.
Most of the time, getting down to bedrock is no easy task. Depending on the area you are panning, there can be considerable overburden that covers the bedrock, and it can take a lot of time and effort to get down to the good gold-bearing gravels.
But if you don’t go to the extra effort to access these richest areas, then what is the point? You do want to find gold, right?
Classify Your Material Before Gold Panning
A good Gold Panning Kit should include a classifier. This is some sort of screen that is used to filter out the larger material.
Remember, most gold that you find is tiny. The vast majority of gold is dust and small “pickers” that are less than ¼” in diameter. Finding a gold nugget by panning is a rare occurrence, so classifying out the larger rocks and gravel that is highly unlikely to be gold is a good idea. There’s no sense wasting space in your gold pan with large, heavy rocks that almost certainly don’t contain any gold.
Classifying does a couple things. First, it removes those larger rocks that aren’t gold. Before you toss them aside, it’s always a good idea to give them a quick look-over to make sure that you’re not pitching a big gold nugget or specimen out, but most of the time it will just be gravel.
Rather than worry about inspecting all of the larger gravel that you toss aside, you could just leave it in a pile and scan it with a high-frequency gold metal detector after you are done to make sure that nothing good was tossed out.
The second benefit of removing the larger material is that the gravels in your pan will stratify more evenly if it is all of uniform size. This will help ensure that fine gold will easily settle down to the bottom of your gold pan, and it will stay there throughout the panning process.
Put a Moderate Amount of Gravel in Your Pan
Loading way too much gravel into a gold pan is another mistake that lots of prospectors make. For one thing, it makes your gold pan really heavy, which can get really uncomfortable during a long day prospecting on the river. When you are uncomfortable, you are more likely to get sloppy with your panning technique, so only put a moderate amount of classified gravel into your pan at any given time.
This would also be a good time to mention that you use a gold pan that is of proper size for you. For most men, a 14-inch pan is a good universal size. For women and kids, smaller 12” and even 10” pans might be the best size.
Sure, a bigger pan can hold more material, but they sure get heavy after you fill them up. Personally, my back and shoulders are a lot happier if I use a reasonably sized pan and work at a reasonable pace.
Get Everything Wet and Break it Up with your Hand
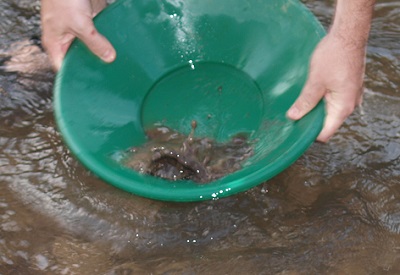 Alright, let’s get down to the nitty-gritty of gold panning! You’ve now got some gravel in your pan and you want to start working it. The first thing you need to do is dip your pan in the creek and get some water in there to completely saturate the gravel in your pan.
Now, BEFORE you do any panning, get your hands in there and bust up any clumps that you feel.
Clay is the enemy of the gold prospector!
It can capture and hold small gold particles, pulling it out of the pan. You want to bust up any clumps of clay that you feel, and in general just make sure that everything is loose and separated. This will allow any free gold particles to settle into the bottom of the pan the way that they are supposed to.
Agitate Vigorously Before Tipping the Gold Pan
Now that you have everything loosened up in the pan, it’s time to start shaking it up, but don’t tip the pan yet. You want to give the gold a chance to get down to the bottom of the pan where you want it.
Continue to agitate the contents of the pan, and you will see that the larger, lighter weight pebbles (with a lower specific gravity) will rise to the top. This is a good sign. This shows us that the contents within the pan are starting to stratify, which is exactly what you want to happen.
Tip the pan, and slowly work it allowing lighter gravels to leave the pan
At this point, any gold that is in your pan should be settled to the bottom, and as you slightly tip the pan and continue agitating the contents the gold will end up in the bottom crease of the gold pan.
Now you can start letting some of the gravel to slowly leave your pan.
Do this process SLOWLY!
You’ve gone to a lot of effort at this point to make sure that you have good material in your pan, and you don’t want to get sloppy now.
Make Sure you are Panning over the Riffles
A gold pan like the Garrett Gravity Trap has several riffles that help to retain gold from falling out of the pan. In theory, you really shouldn’t need these at all, since a careful panning process should ensure that the gold never leaves the bottom crease of you pan. Still, you want to makes sure that your pan is oriented correctly so that the sand and gravel that is leaving your pan is going overtop these riffles. This is a little added “insurance” that you aren’t losing any gold out of your pan.
Tip Upright and Repeat Upright Agitation Several Times Throughout the Process
As you continue to add water to your pan and slowly pan out the contents of your pan, it is very important that you tip your pan fully upright and repeat the initial step of agitating the contents so that the gold will re-settle down to the bottom. It can even be a good idea to put your hands in there again and continue to break apart anything that feels like it’s sticking together. This is especially true if your material has a high percentage of clays.
Continue Until you have just a bit of the Heaviest Materials in the Pan
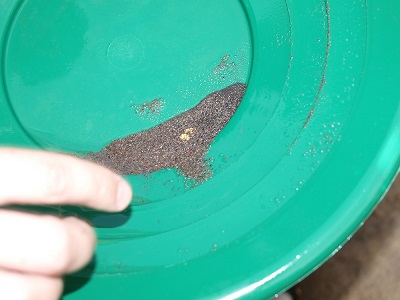
Continue this process until almost all of the lighter material has been washed out of the pan. This process will take several minutes, so don’t get too hasty and try to get it done quickly. Once you have gotten down to just a few pinches of material at the bottom of your pan, stop what you are doing and take a look at the contents.
Almost all areas (especially places that are known to have gold) will have some amount of what is generically called “black sands.” Black sand can actually be a variety of different minerals, but are most commonly made up of hematite and magnetite. These both have a heavy specific gravity and will show up at the bottom of your pan in most areas.
Also Read: Mercury Amalgamation and Fine Gold Recovery
And: Removing Fine Gold from Black Sands
Sometimes there will be other small minerals of various colors that you will see. Garnets are another gem that will often there. They are usually a deep red/purple color. Once you’ve reduced the contents of your gold pan to just these minerals, stop and take a closer look.
Visually Inspect the Contents and Look for “Pickers”
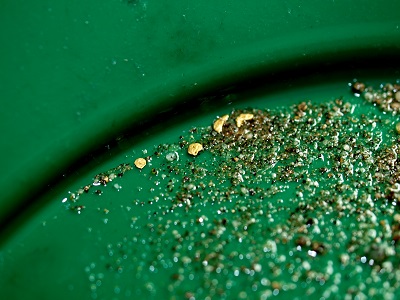 The first think you want to do is take a quick look amongst the black sands and see if you can spot any visible nuggets or “pickers” of gold. Remember, these aren’t likely to be big chunks, but rather little flakes that stand out within the black sands. Casually shake the pan while you look at the contents, looking for any bits of gold that may be exposed.
This is the when having a colored gold pan is really nice, rather than an old metal pan. The newer plastic pans that are green create a nice contrast with the gold that is in your pan, and often the little bits of gold can really stand out.
If you are fortunate enough to spot a nice picker, it is now a simple task of using tweezers to pick it up and drop it into your vial (hence the term “picker”).
It’s always a nice surprise to recover a good sized piece of gold that you can grab with your tweezers. Most of the time it’s too small to grab, so there are a few tricks to help you separate the fine gold from the remaining black sands so that you can capture it and add it to your vial.
Use a Magnet
Some (but not all) black sands are magnetic, so using a very strong magnet can really help to separate it out. There are special magnets that are designed for this task that are reasonably priced that do a great job.
Just be aware that sometimes gold can cling to black sands that you pick up with you magnet, so it’s a good idea to take your reject black sands and keep them in a bucket to look over a second time before you toss it out. It is very easy to lose some gold in this process, so take your time and be sure to look over everything carefully to make sure you are getting all the gold.
Tilt your Gold Pan and Shake it Very Slightly to Create a Line of Stratified Minerals
Doing this final step in the panning process can be a little tricky and frustrating or beginners, but it is really the step where you can expose the tiniest of the fine gold particles that may still remain hidden at the bottom of your pan. You can separate the gold from the black sands with carefully agitating the contents that are left. Tilt the pan just slightly and shake the pan in a very gentle motion. If done correctly, you can get a nice stratification of light to heavy materials, and the gold will show up at the trail end.
Another tip that you can do at this final step is to do a quick flick-of-the-wrist, enough motion that all of the garnets and black sand will move, but the gold will remain in place. This can be challenging at first, but a little practice will improve your skills. And it can be really fun surprise, because it will immediately expose any gold that was hidden beneath the sands.
Use Snuffer Bottle
 The very last step to pick up the finest of the fine gold is to use your trusty snuffer bottle. A good Gold Panning Kit
 will include one. With a snuffer, you can carefully shoot water over top of your concentrates, which blows the black sands aside while leaving the gold.
When you’ve got the fine gold completely separated, you simply suck it up with your snuffer bottle, which can later be transferred to your vial.
Conclusion
I hope this article gave you a bit more information than just the simple “how to” information that is out there. While learning the proper steps of gold panning is important, it really is the entire process that starts with getting the proper equipment, looking in the right places, and putting good quality material in your pan before you even begin.
If there is one bit of information that you should take away from this article, it would be that you need to spend more time worrying about where you get your gravel, rather than the panning technique itself.
Even the poorest panning technique will yield some gold if you are searching in the right areas, but you can’t make gold magically appear in places that it doesn’t exist! So take that extra time needed to find quality gold-rich material.
Happy gold prospecting!