
There are few other hobbies where you can have fun outdoors and potentially make money at the same time.
The interest in gold prospecting is as strong now as it has ever been, but it’s definitely getting harder to find the yellow stuff these days. With the right knowledge and skills there is no doubt that plenty is left for you to find.
How to find gold prospecting areas that others have missed
Tips on how to properly use your gear for the best gold recovery
How to locate historic mining areas where gold has been found
77 Gold Prospecting Tips
How to Find Gold Like a Pro
1. Look in Places Where Gold has been found before
The best way to start your search for gold is to look in the same areas that the “old timers” once looked.
Yes, it’s possible that you might be able to find gold any random place that you look, but you will find that gold is much more abundant in places where it has already been found and there is historical documentation that it occurs there.
Beginners often just go to the nearest river or creek to their home, do a bit of panning, don’t find any gold, and then assume that there is no gold left to be found.
The truth is, there are still TONS of gold out there waiting to be found by prospectors, but you have to know how to find it.
Do the Research
Research is the best way to find the places where gold occurs. You aren’t likely to find a brand new gold discovery, but what you are likely to find is an area within an existing gold rich area that still has some gold.
Find the old mines, rivers, and creeks where the early miners were searching and you are much more likely to have success.
Finding these places can take some experience. Some indicators are more obvious and others are somewhat subtle. An open mine adit is obvious, but a small creek that was hand-placered over 150 years ago might not be so noticeable.
Finding historic mining sites is often dismissed by the beginners, but I assure you that experienced gold miners understand the importance of locating these places.
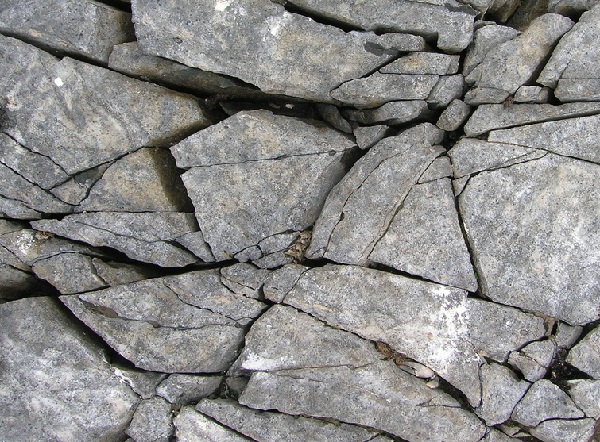
2. Geology and Contact Zones
You need to learn the geology of your particular mining area. There are some natural gold indicators that can be found in most major gold producing areas, but each area can be different. You should learn to spot the types of rock that are associated with gold in your area.
Gold is difficult to find, but learning about the types of rock that it is generally associated with (as well as the types that it is not associated with) will help you find the best areas to focus your efforts.
Contact zones (also called a dykes or intrusion) are places where two major rock types come together. This is a natural geological process that happened millions of years ago. These events would result in rapid heating and cooling, and this often created the conditions needed for gold to form.
Learning to identify the zones can be difficult, but it is something that will become more apparent as you learn to look for it. There are certain rock types that are better from a gold mining perspective.
3 important rock types worth noting are granite, schist, and gneiss. I have found these 3 types of rock to be present in most of the places where I have found gold.
When these geological masses would contact each other, pressure and high temperatures would cause fissures that would result in gold formation. Gold would be pushed to the surface, making it accessible to prospectors without needing to tunnel deep into the ground.
Identifying the general direction of the geology in your mining area is important. In most of the western U.S., the mountains range in a general northwest-southeast trend. Look for contact areas where some other rock type enters at a different trend to the general geological mass. Many of the richest gold bearing areas will have a intrusions that are at a 90 degree trend to the prevailing geology.
While granite, schist, and gneiss are usually the main rock types, that isn’t always the case. It can potentially be any combination of rocks, although they usually make up at least one of them at gold-rich contact zones.
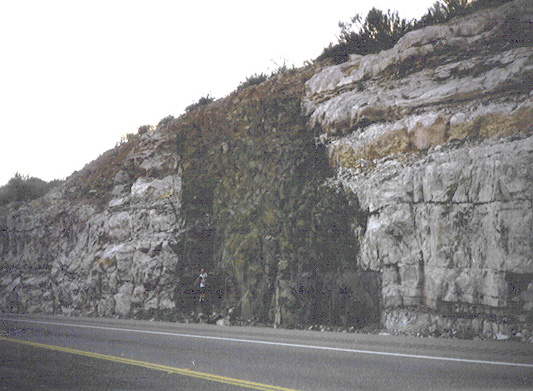
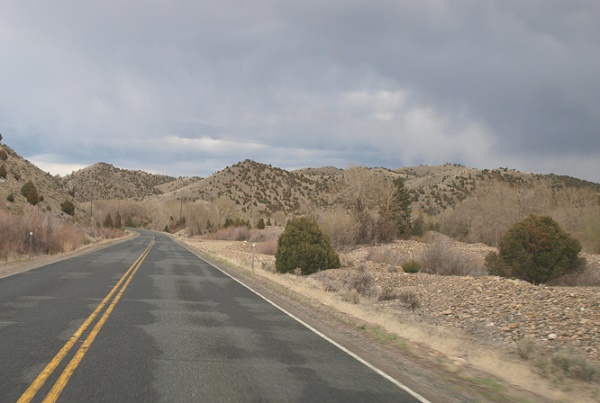
This roadcut exposed a great example of a contact zone (dyke, intrusion, etc.) where a newer rock pushed up through an older existing rock type. Sometimes gold forms in these locations if the conditions are right.
The color changes of soil are also good indicators of a contact point. Sometimes the major source of bedrock has eroded away long ago leaving behind only soil. You may spot a band of reddish soil, indicating an iron rich intrusion that once existed. The host rock has eroded away, but the red soil (and potentially gold) still remains.
The ground changes can be obvious or subtle depending on their size or the difference in color. Ground cover from grass and trees can also hide them. Sometimes the type of plants growing in the different soil types can help you find them.
Contact zones can be as short as a few feet in length, or they can run for miles and miles. In the California Mother Lode for example, you can look at a map and see major gold mines that seem to line up perfectly in a straight line over miles and miles. They have located contact zones with gold.
3. Learn to Identify Natural Gold Indicators
I think that finding historic gold mining areas is the most important first step toward finding gold prospecting areas, but serious gold miners learn how to identify natural gold indicators. These are things that are commonly associated with gold.
While most of the rich gold mining areas have been found, there are certainly still some places out there with good gold that were completely overlooked by others. If you are fortunate enough to find one of these places, you are likely to be rewarded with some exceptional amounts of gold.
Once again, the main takeaway here should be that you need to learn you’re the geology of your mining district. When you understand the geology of the places where gold has already been found, you are more likely to spot the places where it might occur.
Often, the old geological reports that you use to research areas to prospect will tell you about the prevailing rock types found at a particular mine. Pay attention to those details.
Just as importantly, you need to know the rock types that are unlikely to be associated with gold. Don’t waste time looking in areas with a low chance of having gold.
Hematite ~ Magnetite ~ Black Sands
Most of the time when you find gold you will also be finding some black sands. These sands are a variety of iron rich material, most commonly hematite and magnetite.
Black sands aren’t necessarily a great indicator for gold, since there are black sands abundant in places with little or no gold. However, in places where gold does exist you will frequently find gold with these black sands.
Very dark or reddish colored soils are usually high in iron content. In gold country, these are often the first places you want to start prospecting. Iron rich soils can be reddish or even purple, orange, yellow, and other bright colors. It takes a quality metal detector to handle these iron rich soils.
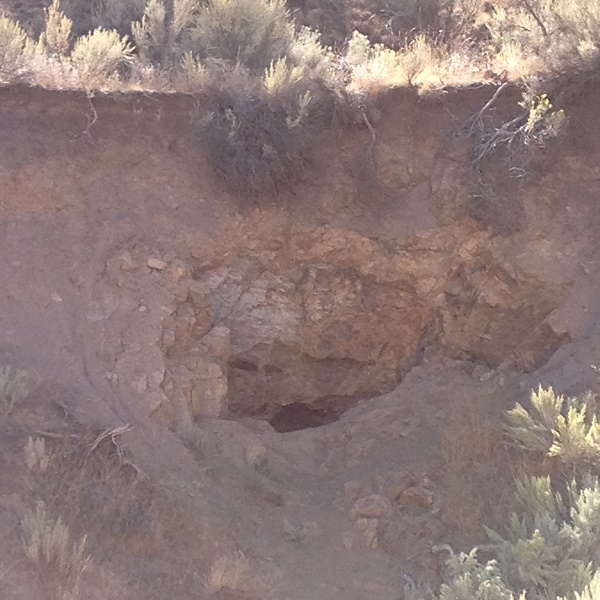
4. Learn to Identify Man Made Evidence of Mining
Evidence of mining activity is most easily seen by finding the disturbances that the early miners left behind.
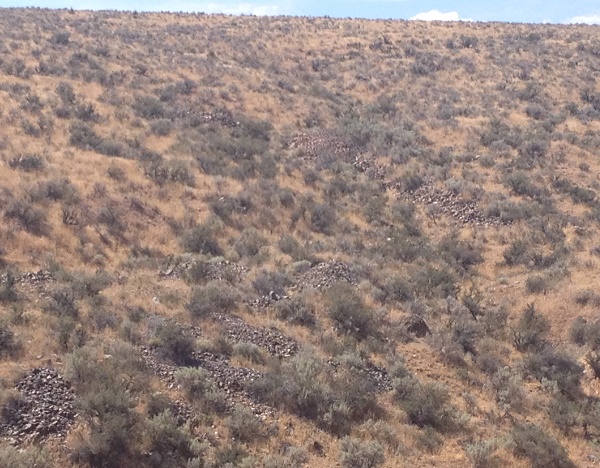
Do you see those rock piles? Those are old “diggin’s” dating back to the 1860s. Miners had to move the big rocks to get down to the bedrock to get to the gold. Learn to spot these tell-tale signs of mining activity.
This old mine adit dates back to the 1920s. I took this picture in a little-known gold mining district in Idaho. If it caves in much more you won’t be able to tell it was ever here.
Sometimes mines are obvious and you can see them from miles away.
Trust me when I tell you that an area is never truly “mined out.” Even places that once had thousands of men searching for gold will still produce gold today. They simply did not find it all. When the gold started to get depleted, the miners would move on. They didn’t get every last piece.
Plus, modern technology like metal detectors can recover gold that was missed by the old timers. Modern sluice boxes will capture gold that was lost by the crude methods employed by these early miners.
We will discuss some of the specific indicators and how to identify them in further in this article.
5. Learn how to find paystreaks
Gold is the heaviest substance that you will find in a creek or river, and because of this it is somewhat predictable in the way that it deposits itself in a waterway. It will form in what is known as “paystreaks,” or lines of gold.
These paystreaks will settle down through the sand and gravel and sit directly on bedrock. They will be richest down in the cracks and crevices of the bedrock.
High water during the spring will add more gold to these paystreaks. They are constantly refreshed by gold that erodes from the hills and feed into the river.
Inside bends of a river where water slows is the best known place to find gold deposits in paystreaks, but they also form in concentrations behind boulders, logjams, under waterfalls, or anywhere that the velocity of water slows.
In recent years, suction dredges were the best way to efficiently mine the gold paystreaks in a river due to their ability to process lots of gravel from the riverbed. Dredges are still the best tool for the job, but permitting and regulations have gotten difficult in recent years. Many prospectors are now limited to using sluices and highbankers in many states.
6. Look for vertical schist
I mentioned earlier that schist was one of the rock types that gold is commonly associated with. This is particularly true when I am metal detecting for gold nuggets. Larger nugget sized gold seems to be in vertical schist in many of the areas that I prospect.
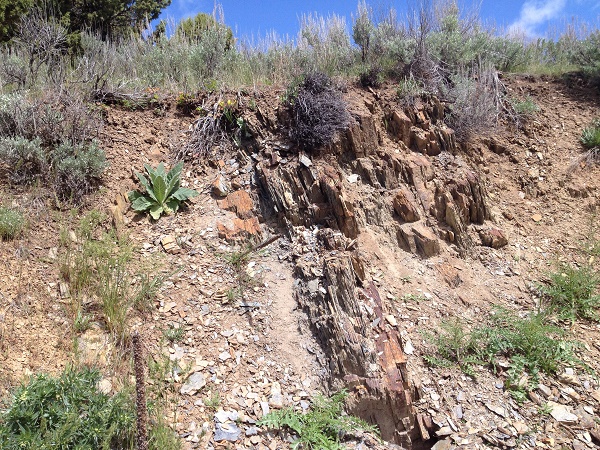
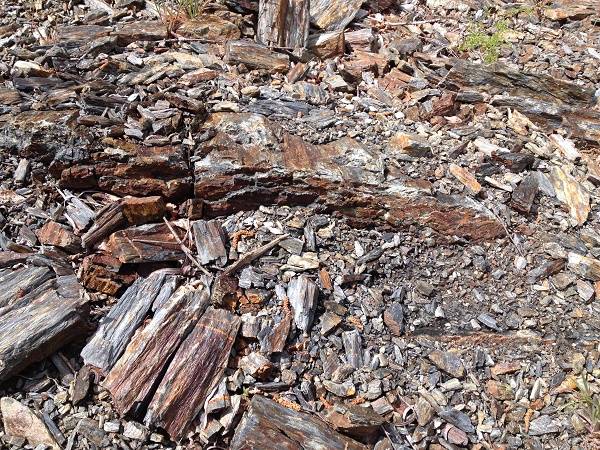
This decomposed schist bedrock is in an area that has produced literally millions of dollars worth of gold since the 1860s. I have found a lot of gold nuggets here. Unfortunately the early miners that worked here left tons of iron trash, making it very difficult to metal detect.
Schist is a metamorphic rock that forms in high temperatures. It will be in thin, vertical sheets similar to the pages of a book. It is a very brittle rock because it heated and cooled quickly. It easily cleaves apart.
The most productive gold areas will often have intrusions of vertical schist as outcrops or intrusions to igneous rocks. These are contact zones that are definitely worth further prospecting if you notice them.
7. Handy Online Resources to Find Places to Mine
The internet can help you find places to mine. Twenty years ago, a person needed to go to the library to find old references and maps to find historic mining areas. This is no longer the case. Today, there is exceptional material available to us right in the comfort of home by accessing the internet.
Google Earth is a really handy tool for finding old mines and other areas that you might want to explore further on the ground. Use the satellite image layer to look for evidence of past mining activity. You can use it to look for old mining shacks, tailing piles that might produce gold specimens, creeks that have been placer mined, dredge tailing piles, hydraulic mine pits, and much more.
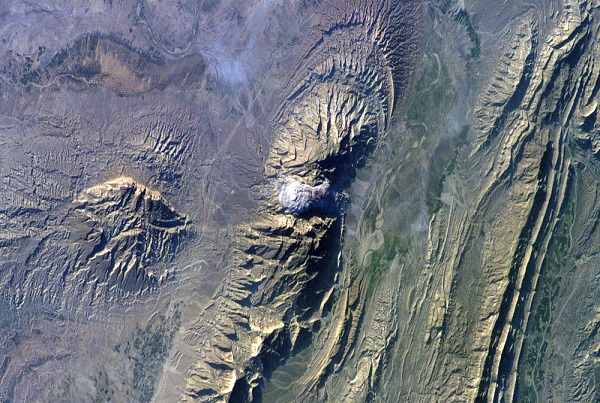
I can spend hours on Google Earth. You can zoom in and identify old mines and other stuff that you can check out on the ground later.
There are many other modern tools that are of great value to the modern prospector. One of the best out there right now is mylandmatters.com. You can use this to locate current and past mining claims. It is updated regularly. In fact, it is much more user friendly than the information that you get directly from the Bureau of Land Management.
You can also use mapping software to navigate remote gold mining areas. Who would have thought years ago that the old paper maps and compasses would be retired for things like iPads, smartphones, and handheld GPS units?
You can get a quick overview about the gold in your state by using the map below:
8. Historic Reports from Government, USGS, old Newspapers
Research is critical to finding gold consistently (are you noticing a trend here?).
There are a variety of different materials out there that will lead you to places to mine. Successful prospectors always do their research. This a great activity to do in the off season when the weather is lousy and you can’t get out.
Books
Most states have a few books (or eBooks) available that will tell you about places where gold can be found. This is money well-spent and will save you time and energy out in the field.
Books don’t always have the greatest detail, but they are the best starting point.
Geological Mining Reports
Books are great for learning more about mining in your state, but after that you probably want to get started doing more detailed research.
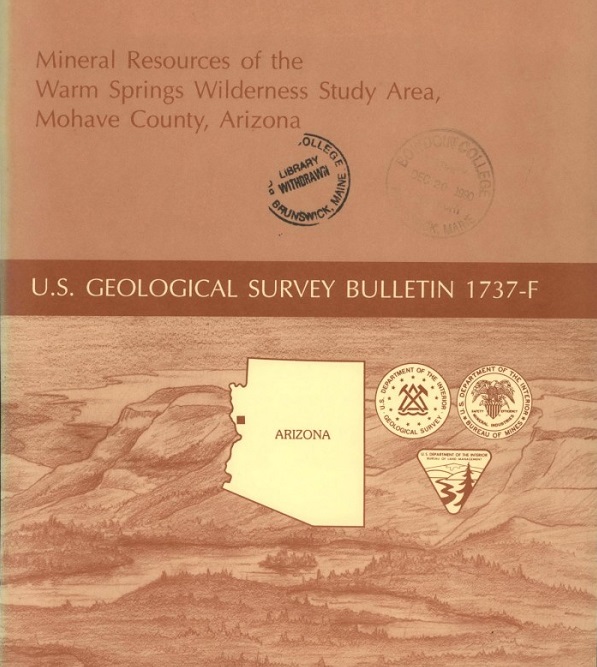
General books are more “user friendly” for the average reader, but mining reports like this often have better detail about potential gold deposits.
Many mining districts have very detailed reports that have been done by state agencies. Many of them are now available online as PDF-reports. They were usually done by the US Geological Survey, Bureau of Land Management, or agencies within the state.
These mining reports have a lot more detail than most books, but they can be harder to read since they are scientific papers. They will usually have details about specific mines so they are a very valuable resource.
These reports will sometimes give detail about the purity and size of the gold found. This is great because it can indicated whether the gold is large enough to be found with a metal detector.
Old Newspapers Articles
Your local library might have copies of historic newspapers available for you to look at. If you can find a newspaper from the 1860s, you will find a “gold mine” of great information. Articles about new mines and gold discoveries were common during this time.
9. Use LR2000
When gold mining on public land in the United States, it is every prospectors responsibility to know if they are in an area that they can legally search for gold. While there are many areas that area open and available for legal prospecting on public land, you must also understand that much of the best gold-bearing ground out there has already been claimed.
To learn if an area that you want to prospect is open to prospecting, there is a tool called the LR2000 that can help you in your search. Learning how to use the LR2000 is beyond the scope of this article, but the Bureau of Land Management has some good guides that can help you understand how to research active and recently closed mining claims in your area.
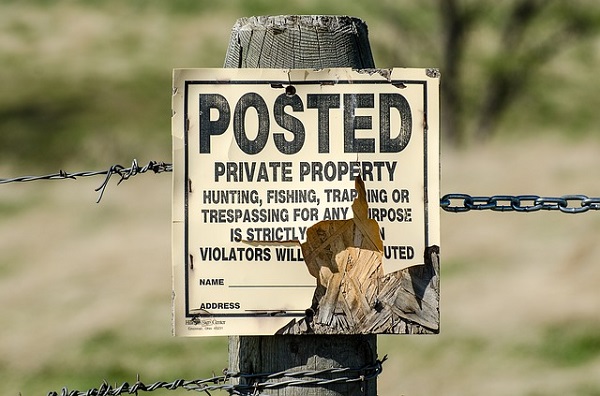
Don’t be careless about this step. It is your job as a responsible prospector to understand where you can legally search for gold. Claim markers can get torn down and stolen, but it does not mean that you are not on an active claim just because you don’t see claim posts. Regardless of where you live, it is your job to learn where you are allowed to prospect.
Also Read: Beware Exaggerated Richness of Gold Mines & Claims
And: Abandoned Mining Claims are Great Places to Find Gold
10. Use good maps with land ownership
You need to understand how to read a map and how to determine who owns a piece of land before you go prospecting on it. If land is private then you will need to obtain permission. If it’s public land, you need to make sure that it hasn’t been claimed by someone already.
The easiest way to determine land ownership is to get a map from the BLM or Forest Service for your area. These maps will include the land ownership, letting you tell the difference between private and public lands.
Thes maps will lack some detail that you need, but they are good for general navigation. Finding access roads into old mines will be worth the purchase alone.
The detailed 1:24,000 scale maps are the best ones, and will show the best detail, sometimes even including mines and prospects. However, it is the 1:100,000 scale maps that will usually show land ownership information.
11. Get Permission from claim holders
Unfortunately, many of the richest gold-bearing areas today are all claimed up. In some rich gold mining districts, it can be very challenging to find an area to prospect that has good gold.
One way to gain access is to find out who owns the claim to an area, and simply ASK if you can do some mining on their claim. You might be surprised how often a claim holder will grant you access to do some prospecting.
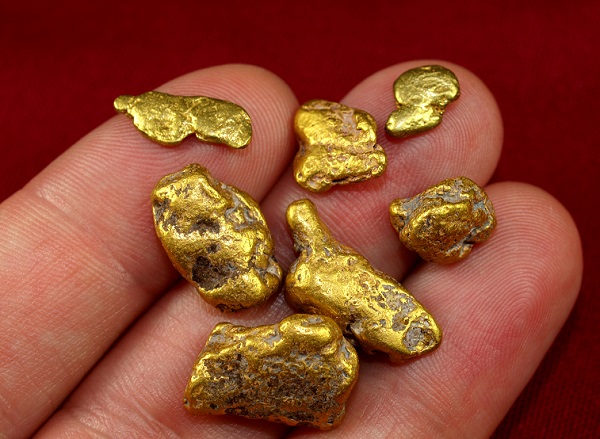
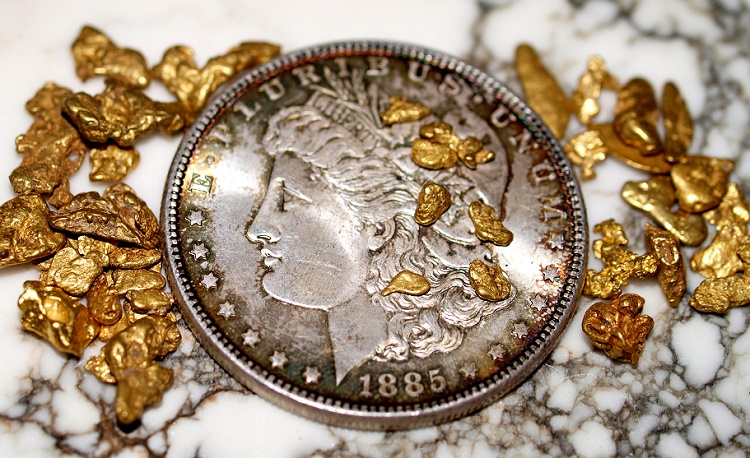
These gold nuggets came from an existing gold claim. Many of the best mining areas are actively claimed and they are likely to stay that way. Your only chance to get access to these places is to talk with the existing claim owner and see if you can work out a deal…
Now I wouldn’t expect them to give you unlimited access to their claim, but often if you are just using some small equipment like a gold pan and maybe a small sluice box
, the miner won’t mind you taking a little bit of gold off of their claim.
I also know some prospectors who make agreements with claim holders where they agree to split what they find. This is a predetermined agreement, where the prospector gives 10-20% of their gold finds to the claim holder.
12. Hike It! – Get Away from the crowds
Hiking and getting away from the crowds might be the best way to find new and undiscovered gold deposits. The better known goldfields have been hit pretty hard over the years, and some of the well-known mining areas have been picked over.
That isn’t to say that you can’t still find gold at these more well-known gold mining locations. To the contrary, I don’t think an area is ever truly “worked out”, and spring rains and erosion will often replenish placer gold deposits each year so new gold is can always be found. But finding big concentrations of gold in these areas isn’t likely.
Hiking into remote locations might be the best way to find rich, undiscovered gold deposits. The same can be said for reworking old hydraulic pits, historic placer diggings, and various other areas that were mined historically. These areas may have already been mined, but the ones that are further from the roads have not been reworked by modern day gold prospectors nearly as much as the places that are close to the road. Strapping on a good pair of hiking boots could make a big impact on the amount of gold that you find!
13. Look for “gold” sounding names on the map
This one might seems silly, but it can actually be a great indicator to help you find new places to explore and search for gold. Look at a map for names that might indicate that gold has been found there. The miners that named some of these areas weren’t always that creative; it seems that every gold district has names like “Eureka Gulch”, “Gold Creek”, “Quartz Gulch”, “Nugget Creek”, etc. These were usually places where mining took place. Seek them out and do a bit of prospecting to see if there is actually gold there.
14. Contact Landowners for access
Much like contacting claim holders, contacting private landowners is another good to get access to mining areas. Some of the richest spots are on private lands, so it may be well worth your time to try and identify who the landowners are and talk to them to see if they will let you do some prospecting.
There are some amazingly rich gold prospecting locations on private land. It might be worth asking the landowner for access.
Much like when dealing with claim holders, making an agreement on a split of the gold finds might help you to gain access. Sometimes landowners are interested in the history of their property, so if you are metal detecting for nuggets you might offer to give them any relics that you happen to find also.
It never hurts to ask, and it might give you access to some good ground that most others pass over.
15. Pick an Areas and learn it
One mistake that many prospectors is the idea that it is always the far-away places that are the most productive. I liken it to that old saying, “the grass is always greener on the other side.”
Especially if you are fortunate to live in an area that has gold nearby, spend your time to actually learn the geology and history of the area that you are in. You don’t need to seek out the far-away places to have success finding gold. I have no doubt that there is good gold nearby, but you need to spend the time to learn your area.
Sure, half the fun of gold prospecting is to explore new areas and I would encourage anyone to do that too. But the most successful prospectors I have ever met have an intimate knowledge of the history and geology of their own mining areas.
16. Prospect with a Partner
Prospecting with a partner can be a lot of fun, but it can also help you find more gold. Simply put, more people digging will help you sample more ground in a short amount of time. One a rich paystreak is located you can both focus you efforts on the richest areas. This can speed up the process of finding gold.
Of course, the other benefit of prospecting with a partner is safety. Gold is often located in places that are far off of the beaten path. It is smart to be with someone in case something bad happens.
Plus, gold prospecting is just more fun when you can share your adventures with someone!
17. Equip Your Vehicle for Prospecting Season
Some of the richest gold mining areas are very remote, located many miles from the nearest town. This is one of the things that makes gold prospecting such an enjoyable outdoor activities, but it also means that you need to go prepared so that you stay safe out in the backcountry.
If you spend enough time in the backcountry, you are likely to encounter a tricky situation. Whether that is getting lost, a flat tire, breaking down, or just losing your direction for a little while, having the proper preparation in place will keep you safe.
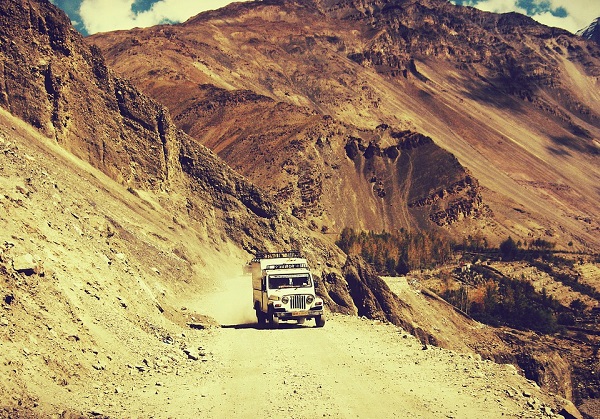
Your gold prospecting adventures can take you to some remote places. Make sure that your vehicle is properly equipped for those trips into the backcountry.
Before leaving town, make sure you tell someone exactly where you are going. Hopefully you will be accessible by cell phone, but some areas don’t have coverage. Remember that, and never depend on your cell phone to keep you out of trouble!
Here are just a few things to keep in keep with you when you venture into gold country:
- A good vehicle – one that has high clearance and 4WD is best
- Survival Gear
– A first aid kit, dehydrated food, and plenty of water
- GPS
– handheld GPS Units are inexpensive. Bring extra batteries!
- ATV – Many prospectors use ATV’s to navigate the backcountry
- Map – don’t depend on your GPS. Bring some paper maps too
- Compass
– learn how to use it properly with your map
18. Be Comfortable (bring proper gear for conditions)
You definitely need to bring along the proper survival gear with you, but you also want to bring along the extras that you need to be comfortable while gold prospecting in remote areas.
You don’t want to bring “everything except the kitchen sink,” but you should bring plenty of extra gear along with you so you will be productive throughout the day.
Here are a few things that come to mind:
- Extra Batteries – for your GPS, metal detector, flashlights, etc.
- Proper Clothes – Even in the summer, bring enough clothing to stay warm
- Good boots – if you are metal detecting make sure they are non-metallic
- Insect Repellent
– worth its weight in gold when the mosquitos are out!
- Sunscreen
– keep the cancer off your skin!
- Backpack
– a good daypack a must-have to carry your gear
19. Gold Panning Tips
The simple gold pan is the most important tool in any prospectors arsenal. Even if you have a sluice box or metal detector, you still need a gold pan for sampling. It is the quickest and easiest way to find concentrations of gold.
You don’t need to pan tons of gravel. The trick is to get down to the bedrock and sample the gravels that are likely to have the richest gold. Overloading your gold pan is a mistake. It will make your panning method sloppy and you will lose gold. You are better off carefully panning a smaller amount of higher quality paydirt that you collect right off the bedrock.
Here are some simple steps to gold panning:
- Add material to your gold pan and break it up with your hand
- Make sure all clay is broken apart
- Agitate the contents of the pan thoroughly to help gold settle.
- Tip the pan and shake some material out (over the riffles!)
- Upright the pan and re-agitate everything to get gold to the bottom
- Repeat this process until only the “heavies” remain
- Visually inspect your pan for any gold pickers or nuggets
- Use a snuffer bottle
to recover the fine gold dust
For more detailed instructions read: The Ultimate Gold Panning Guide – How-To, Tips & Tricks
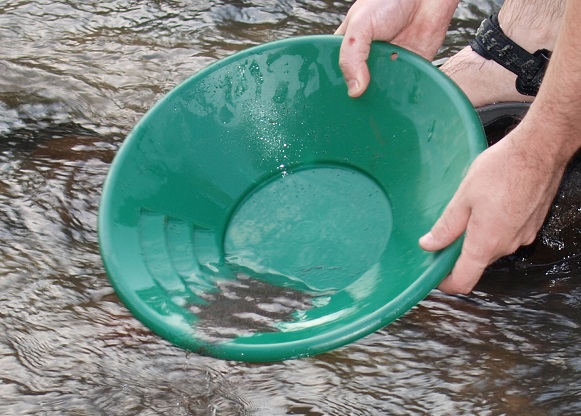
20. Choose the proper gold pan for you
Use a gold pan that is a good size for you. Again, you don’t need a huge pan. The 14” gold pan is a good standard size. If you are backpacking into remote areas then even a 10” or 12” pan will work just fine.
I think the newer plastic pans are superior to the old metal pans. They are lighter, they don’t rust, and they weigh a lot less. They also come in various colors which helps you spot the gold in the bottom of your pan. You can get a nice quality plastic gold pan for less than $10.
You can also get a good quality gold panning kit that also include classifiers, snuffer bottle, and other handy tools for gold recovery.
21. Use snuffer bottle and magnet
You will probably find lots of black sands when you are panning and sluicing for gold. Some of these black sands are magnetic, and you can remove them with a strong magnet.
There are specialized magnets for this task that work quite well and are reasonably priced.
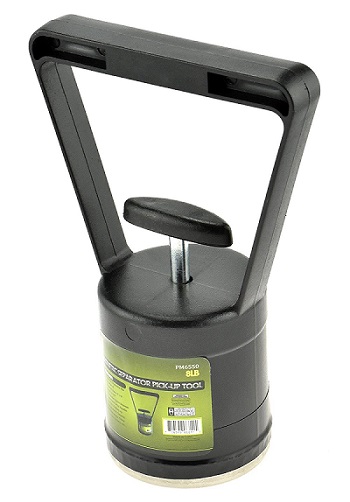
These are a handy tool for removing black sands from your gold pan. They probably won’t get it all, but they are still worth adding to your prospecting kit.
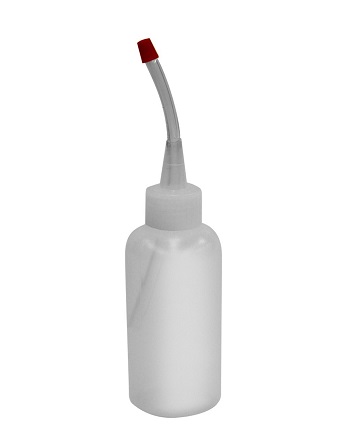
Every prospector should have a snuffer bottle. They only cost a couple bucks and they work great.
Be aware that sometimes collecting black sands with a magnet will also pick up a bit of gold. Make sure you aren’t losing valuable gold in the process.
Not all black sands are magnetic through, and you will have some fine black sands, garnets, and other material mixed in with your fine gold.
Use a snuffer bottle to expose the fine gold underneath these other materials. It is a simple, inexpensive tool that every prospector should keep in their clean-up kit.
22. Sample, Sample, Sample!
One thing that separates the truly successful gold miners from those who aren’t is the willingness to take time to thoroughly sample an area to locate the richest ground to mine. Not all areas are created equal; to the contrary, even in rich gold-bearing areas the gold is found in rich concentrations in certain areas.
If you take the time to sample many areas and identify where the best gold can be found BEFORE you spend time setting up your equipment and digging a lot of gravel, you will find more gold as an end result.
23. Classify your Material – Panning, Sluicing, Drywashing
Classifying is simply the process of removing larger material such as rocks and debris from the richer concentrates.
Simple gold classifiers that work well with a gold pan can be purchased for very reasonable cost. They will remove the rocks without missing any gold, since gold is almost always small enough to fall through the classifier.
I suppose it’s a good idea to look over the rocks that you remove and make sure there isn’t a whopping gold nugget in the pile. Realistically that isn’t going to happen since most gold is very small, but just to be on the safe side you can always check the material with a metal detector to make sure you didn’t toss out a nice nugget.
Classifying takes some extra time, but it is worthwhile because it increases the efficiency and gold recovery. You should classify when you are panning and sluicing for maximum gold recovery. Drywashers and highbankers are usually designed with a grizzly that classifies material as you shovel into the hopper.
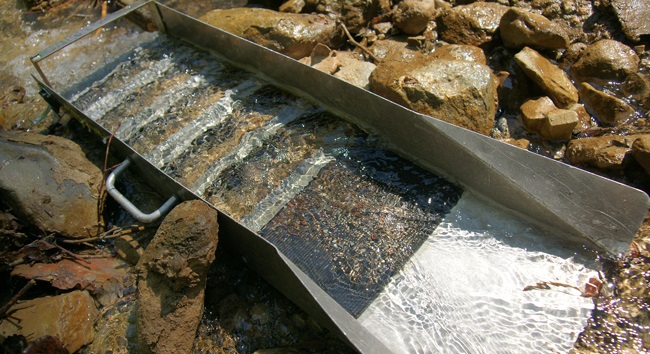
24. Feed it Slow! Don’t add to much material too quickly
When feeding material into a sluice box, you don’t want to add it too fast. For a sluice to operate at its peak performance, you should add gravel at a moderate pace. This allows the for the functionality of the sluice to do what it is supposed to do, by allowing lighter material to be discharged out the back while heavier materials are retained in the riffles of the sluice box.
Getting the proper water flow through your sluice box will ensure that you capture the as much gold as possible.
Rather than digging and shoveling directly into the head of the sluice, try classifying your material into a 5-gallon bucket, and then slowly adding material with a small scoop.
Watch how the sand and gravel works its way through the sluice box and out the other end. It should evenly flow through the box and over the riffles evenly. With some trial and error, you should get a feel for how fast you should be adding material.
You can add more material at once if you have already classified your gravels. So you will actually be able to sluice faster once everything is classified down.
25. Set You Sluice Correctly – Proper Flow
The perfect setup will depend on the specific model and style of sluice box that you are using, but in general the requirements are similar. You need to have a decent flow of water that will move material over the riffles; enough flow that lighter materials will move out of the sluice and be discharged out he back.
Remember that you want to do some sampling with a gold pan before you bother to set up your sluice. Proper sampling will ensure that you are working in a productive area with enough go to justify using a sluice box.
If you haven’t ever used a sluice before then it will take a little trial and error to get it going right. Set the sluice up so that water flows through the box. If the stream has limited water flow then you might need to move around a bit to find a good spot. Ideally, the spot you chose will be relatively shallow so that you will only have an inch or so of water running over the riffles.
In streams with limited flow, this will probably require that you arrange rocks in a V-shape at the head of the box to channel more water into the head of the sluice.
Use a few heavier rocks to lock the box in the stream channel.
You want the sluice to be relatively flat, with just a slight downward angle. This will help move the lighter stuff out of the box, but you don’t want to much angle. Just an inch or two higher on the head than at the back of the box will work just fine in most instances. Again, the proper adjustments will depend on the water flows.
You want the speed of water running through the sluice to be just enough, but not too fast. If the flow is too fast, you will definitely lose fine gold. If it’s too slow, the riffles will get clogged with sands and you will also lose gold, so you need to find the optimum speed.
This can definitely take some testing and experience to figure out. Take a look at this video below. He really does a good job showing explaining the process:
Sluice boxes are really handy tools for gold prospecting. If you already have a gold pan, but you want to step-up to something that you can move a little more material then a sluice box is the way to go. They are still inexpensive, but they will increase your gold recovery.
26. Use Special Low-Flow Type Sluices for Low-Flow Creeks
There are specially designed sluice boxes that are used specifically for capturing fine gold in creeks that have low flow rates. These are ideal for some areas.
Most gold bearing creeks and rivers have a fairly fast flow, and therefore a normal sluice box is ideal. However, many creeks in the Midwest and Eastern U.S. have very low flow speed because of the flat terrain. Late summer will often result in stream flows that are too slow also.
An average sluice box will perform poorly in these creeks, because the flow of the water is not sufficient to separate the lighter sands from the heavies. The riffles will quickly become clogged with sand and gravels.
Using one of these specially designed sluice boxes, combined with carefully classifying your material, will aid in the optimal recovery of the fine gold.
Tip: Talk to local prospectors in your area. They have probably tried many different types of equipment and determined what works best for your area.
27. Use newer matting for better recovery
The mining equipment used today is actually very similar to what the old timers used during the early gold rush. The general concept of gravity separation of gold has not changed, but there have definitely been some advancements over the years that help us modern prospectors recover a lot more gold.
One advance is the great choices for matting that you can use to line your sluice boxes, (whether in a normal sluice, highbanker, dredge, etc.). When prospectors first started adding matting to their sluice boxes they used carpeting, and later miner’s moss.
This increase recovery rates of fine gold significantly. Now there are highly specialized mattings that do an exceptional job at increasing recovery rates, particularly with fine gold. The added cost of this specialized matting material will pay itself back with increase gold production.
28. Use a drywasher to work isolated gold sources
If you prospect in the Southwest, then I’m sure you realize that water is limited. There are some exceptionally rich mining areas in Arizona, California, Nevada, and New Mexico that just don’t have any water at all.
The gold is still there, but gold pans and sluice boxes are not going to cut it.
Metal detectors work well in the desert for finding gold nuggets, but when gold is fine textured something else is needed to capture the gold. This is when the drywasher is used.
Drywashers look a lot like a highbanker with an elevated sluice box that you can shovel gravel directly into. However, unlike the highbanker, there is no water involved.
The Tool for Desert Prospectors
Instead of water, the drywasher uses air pressure and vibration to separate gold and black sands from the lighter gravels. Power can come from a generator or battery, or there are simple hand crank models just like the early prospectors used. Both will work just fine.
Material that you put into a drywasher needs to be totally dry. If it is damp at all, then it will perform poorly. Soils will clump together looking up the fine gold. This is why drywashers are rarely used in wetter climates like Oregon, Idaho, or Montana. Even in the heat of summer soils are usually too wet to be processed with a drywasher, so you are better off using more traditional methods.
If the soil is at all damp, then it is best to dig out your material and spread it out in a thin layer exposed to the sun. Then come back in day or two when everything is dried out to process it through the drywasher.
If you get a drywasher set up correctly you can recover some really nice gold. Check out this 5-ounce cleanup by a couple hardcore prospectors in Arizona:
Always use a sensitive metal detector like the Gold Bug 2 to scan your drywashed tailing piles as you go. Even under the best circumstances, drywashers will lose some gold, and a quick scan with a metal detector will often produce a nugget or two.
29. Use bigger equipment to process more gold
Once you have sampled an area and located a rich gold deposit, you should try to process as much material as possible. Gold pans and sluice boxes are great for small-scale prospecting, but if you really want to start finding good quantities of gold, you should try to use larger mining equipment.
This one is simple to understand… the more gold-bearing material you process, the more gold you are going to recover. Equipment that can process lots of gravel will result in more gold in your vial at the end of the day.
30. Bring a Kid with you!
Gold prospecting is a lot more fun when you have good people around you. Next time you venture out into the hills, take a kid out with you! Gold panning is a fun activity for the whole family, and a great way to get the kids out of the house and interested in the outdoors!
31. Use a Suction Dredge
For serious placer mining operations, the suction dredge is the best tool to process large amounts of material from the riverbed as quickly as possible. Dredges have a learning curve to operate efficiently, but one you figure out how to use them properly you will find that they are by far the best way to get the most gold in the least amount of time.
A dredge basically vacuums up the gravel from the bottom of a creek or river. Divers use wetsuits and snorkels to go underwater and recover gold. In a small creek during the summer the prospector might just use a simple snorkel and wear shorts and a t-shirt. On a large river, divers will use full scuba gear and wetsuits to go deep underwater for hours at a time.
The operator uses a hose to suck up material directly off the bottom of the river, which is pulled up to a floating sluice box. There are various different styles of suction dredges. Much like a standard sluice, the operator can experiment with different setups to achieve optimal gold recovery.
The material is pulled off the river bottom, up through the hose, over the sluice, and then out the back to fall back into the river. This means that nothing is actually removed from the river except the gold that is captured in the box.
Although suction dredges have minimal impact on the river system, misinformation is causing dredging to be severely restricted and even banned completely in many states. This is unfortunate because the modern suction dredge has minimal effect on the river ecosystem, and is simply the best way to mine gravels from a riverbed.
32. Use a Highbanker
Highbankers are good tools for the small-scale placer miner. Although they require more physical labor to operate than a suction dredge, they can still process a good amount of material. Gravel is manually shoveled into it.
Highbankers are portable, but less-so than an average sluice box because they include a pump and other gear to make them operate. It is still possible to pack them in to remote locations, but they are heavier and it will take more work than just a sluice box.
The operation of a highbanker is relatively simple. Basically it is a power sluice, which pumps water from the river to push water over the riffles.
Getting proper flow takes some trial and error just like with a basic sluice box. You want enough water running through the box that all of the fine material runs through and is discarded out the back, while retaining the heavier materials (gold, garnets, black sands) in the head of the sluice.
Most of the gold that you recover from your operation should be caught in the first few riffles. If you are noticing that gold particles are accumulating far past midway in the sluice then you should experiment with slightly less water flow. Adjusting the pitch of the highbanker may also be needed to obtain optimal gold recovery.
Some maintenance is needed to keep a highbanker going. Gravel will pile up at the back end of the sluice, so you will constantly need to remove the tailings.
Below is one of the best instructional video I have come across that teaches you how to properly set up your highbanker.
The real benefit of a highbanker is that you can mine material that is some distance away from from the water. Sometimes there are ancient river channels a short distance above the current river channel that is actually richer with gold than the river itself. You can set up a highbanker right next the this exposed river channel and feed it right where you are digging. Just keep in mind, the higher your equipment is set up above the water that you are pumping from, the more your pump will have to work, the more fuel you will burn, and your equipment will wear out sooner.
Highbankers are a good option for working areas that are some distance away from the water, and they allow you to mine a decent amount of gravel in a long day of digging.
33. Use Gold Vacuums to clean the cracks in washes
Did you know vacuums can be used to mine for gold in arid environments? They are a great option for places where traditional mining equipment like pans and sluices just don’t work.
They are basically just a shop vac that is set up to be carried on your back and portable so that you can pack them into gold country.

To work efficiently, you need to use it directly on bedrock. You will need to remove the overburden, which generally contains very little or no gold. When you get down to bedrock then the vacuum can be put into action.
They do an awesome job of cleaning bedrock cracks, and work much more quickly and efficiently than standard crevicing. However, there will still be times when compacted dirt and caliche will lock up gold down in the cracks. Most of the time it still works well to have a tool with you that you can open up the cracks as you are vacuuming to get the best recovery.
One of the best ways to find a good place to use the gold vacuum is to first locate a gold nugget by using a metal detector. Once you’ve found a nugget or two, you then slow down and work the area more carefully, knowing that gold is present. The metal detector will find bigger pieces of gold at the surface, but running the gold vac will likely pick up fine gold that you would miss if you only used a metal detector.
Desert prospectors are limited in the types of equipment that they can use, so it’s nice to have another option in your arsenal. I would recommend a special gold vacuum to any desert gold prospector. You can buy them, but they are also pretty simple to build yourself using a standard 5-gallon bucket, a small generator, and a pack frame.
34. Search for gold deposits above worked placers
Most gold-bearing creeks and rivers in gold country were placer mined for miles and miles. Many prospectors think that the gold found in these waterways come from just a few lode sources. To the contrary, I believe that most placers are fed by numerous small lode gold deposits that feed into the waterway over a course of many miles. Countless gold sources have been overlooked in gold country because they are “high and dry”, located well-above the water.
Will all the land out there, how do you begin searching for these gold deposits that are feeding the placers? Well there are a few indicators. One thing to look for area areas where it seems that the old-timers spent more time digging. Places that seem to have more “diggin’s” and more piled up rocks probably means that they hit a rich placer deposit in the creek, richer than the surrounding area. Sometimes these “diggin’s” went out further into the banks than the rest of the creek. This is a good indicator that there is a source somewhere above the creek close to this location.
Another tip is to try and notice if it looked like the old-timers pile rocks more on one side of the creek than the other. When they worked their way placer mining up the creek, they would notice that one side of the creek was richer than the other. They had to toss the rocks somewhere, and they would toss more off them on the side that wasn’t as rich. This is an excellent indicator of which side of the creek was richer, and therefore gives you an idea of where the lode gold would be located that is feeding into the placers.
35. Dig in natural areas where gold would settle
This is basic stuff, but despite the well-known fact that gold accumulates in certain areas because it is so heavy, there are still lots of beginners who don’t spend time thinking about where to dig for gold. They will just dig anywhere along a gravel bar and expect to find gold.
Gold concentrates in paystreaks on the inside bends of waterways. These are the areas that water speed slows down, and gold particles that are moving downstream will eventually drop down and settle in the gravel. These paystreaks can be tricky to locate sometimes, and don’t always follow the exact line that you might expect them to. Experience helps.
Gold will also accumulate behind large boulders and other structures. Anything in the water that creates some slack water will cause gold to slow and settle. The gold will then work its way down into the gravel and down to bedrock where it will usually stay until there is extreme high water event that moves it, or a prospector comes along and finds it.
36. Sniping and crevicing for high quality cons
Most prospectors are too lazy when they dig for gravel along a creek. They casually dig down and scoop some material into their gold pan. The results are usually not that good.
What they really need to do is dig deeper. You need to get down on solid bedrock. The when you get to bedrock, you need to scrape out the cracks and grooves in the bedrock to get the best material. This is where the good gold is!
These deep bedrock cracks can hold a surprising amount of gold. Cleaning them out can be a slow process, but patience will often pay of in the end.
Special tools will help with this task. Having a nice variety of things like chisels and screwdrivers can give you options when you need to get deep down in a narrow crack. There are also handy crevice tools that work well.
Spend more time cleaning out the cracks and you will find more gold, guaranteed.
37. Work an area thoroughly
A smart prospector one said “Don’t run away from the gold!” This means when you’ve found the gold, stay on it and get it all! It is amazing how many times a prospector will find some gold, spend a little time digging in the area, and then move onward. If you’ve found a nice pocket of gold, take the time to mine it properly.
This is also true if you find a gold nugget with a metal detector. If there is one nugget, there is a very good chance that there are more. Yet prospector will often dig up a nugget and then keep on moving, looking for the next one. You are better off staying put… take some time and look around the immediate area. Work slowly. Maybe try removing some overburden and expose some fresh bedrock. You might be surprise how much more gold you will find within just a few feet.
38. Work areas with rough, jagged bedrock
During high water events, gold moves downstream until it reaches some type of obstacle that prevents it from moving on. When it reaches bedrock, it will continue moving until it finds a spot that can catch and hold the gold. If the bedrock is smooth, it will just keep on moving until it finds a nice crack that it can drop into.
Rough bedrock will capture and hold gold much better than if it is smooth. Even cracks in smooth bedrock won’t always accumulate a lot of gold because water will wash into the cracks and force it out. The best bedrock to look for gold is the rough, gnarly bedrock where gold nuggets can slip down and get wedged into the cracks.
39. Think of where fish would be
Gold will usually settle in areas of low pressure, on inside bends of creeks and rivers, behind large boulders, and similar areas that are close to fast flowing water but in small pockets of slower flows. These are the same types of places where fish like to hang out. If you know where the fish hang out in a river, you’ve found an area that has good potential for gold.
40. Search above the present water line
Always remember that gold generally only moves significant distances in a creek or river during extremely violent high water events, generally during spring runoff when water flows are at their highest. Gold can move great distances during this time, and almost not at all during other times of the year.
Most people pan for gold during the summer. The river that you are panning probably looks very different than it did just a few months earlier when water was flowing at its peak.
At that time, gold could easily have been well above the current water line. Perhaps a nice gold nugget settled behind a boulder that is now 20 feet above the current level of the river? Think of what the river looked like during these high water events, not just what it looks like right now. It might help you stop some rich areas that have been overlooked by others.
41. Use a Gold-Specific Metal Detector
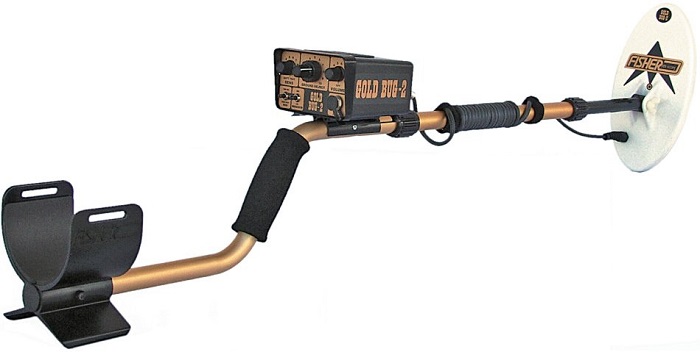
I have seen a lot of beginners try to “make do” with whatever metal detector they already have to try and find gold nuggets.
This is a bad plan. Those coin detectors just aren’t cut out for the goldfields.
Every successful gold detectorist I have ever met uses a gold-specific detector, one that was designed for the specific purpose of finding gold nuggets.
I have already written extensively about this subject. Check out:
The Best Metal Detectors for Finding Gold Nuggets
15 Metal Detectors that Will Find Gold Nuggets
The above links provide much more detail, but here is a short list of some of the most popular nugget detectors on the market today. I will list these from least expensive to most expensive. They range from a few hundred dollars to several thousand dollars.
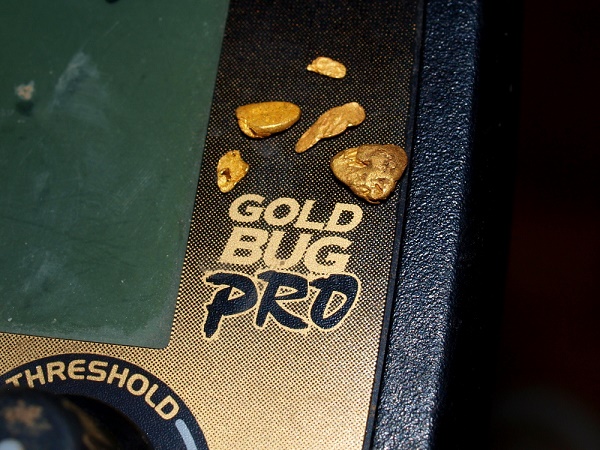
Five beautiful little gold nuggets found with a Fisher Gold Bug Pro.
42. Detect for Gold in Bucketline Dredge Tailings
Tailings pile that were left behind from old bucket line dredges, dragline dredges, doodlebug dredge are some of the most obvious scars of historic mining. They are common in many rich placer mining areas throughout the West. They are usually large piles of smooth river rocks that can be seen for miles. Dredges were usually used in the richest areas of the river.
While these old dredges aren’t used much anymore, there is still gold being found in these areas. Prospectors today can use metal detectors to hunt for gold nuggets in these old tailing piles.
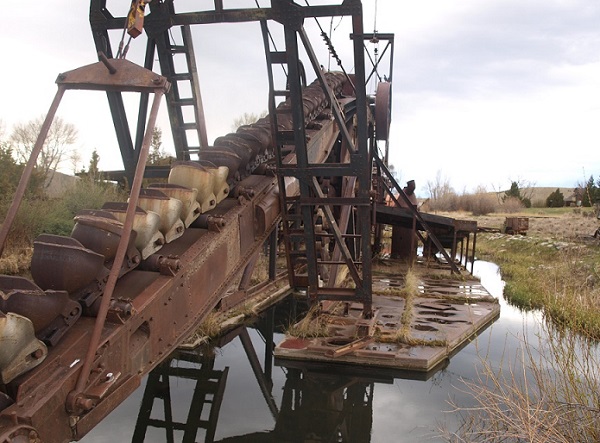
These old dredges used a series of buckets (each about the size of a bathtub) to dig up river gravels. The amount of material that they moved was enormous. This one still sits in place in Alder Gulch, Nevada City, Montana.
The dredges left behind miles and miles of tailing piles. They are evident by large, uniform river rocks in big piles. Since most of the soil was washed away during the mining process, they will have very little vegetation growing on them.
These dredges processed huge amounts of material, but they weren’t always very efficient. It really depended on the dredge, since they were all different. Some estimates state that these old bucket dredges lost nearly half of the gold that ran through them. The crude mining equipment at the time was not capable of capturing gold the way that we can today.
Also Read: Finding Information about Historic Mining Areas
Another thing to note is that these dredges would classify out the larger material. All of the rocks bigger than 3/4” were removed and never even run through the sluice box. This means that ALL of the big gold nugget and specimens were lost in these operations.
There have been some exceptional gold nuggets found in old dredge tailing piles! Think about it. These dredges were used in some of the richest gold bearing areas in the world, yet they lost nearly all of the big nuggets and specimens that they churned up.
Metal detectors are the best tool to use for finding gold in tailing piles, but it is definitely challenging. Tailing piles are usually littered with all sorts of iron rubbish, making the trash to gold ratio exceptionally high. If you are hunting for gold in dredge tailings, then you should expect to dig a lot of trash.
A good VLF detector is the preferred type of detector to use here, since they have discrimination that lets you be selective about the targets that you dig. The Gold Bug Pro is a favorite of mine. Even when you are selective, you will still dig a lot if iron rubbish.
Dredge tailings definitely have good potential for gold, but make sure that the area does in fact produce nuggets. Remember, there were some exceptionally rich gold districts that never produced any large gold. These places are not going to be very good places to hunt with your detector.
43. Look for Identify Ground Sluicing /Hand diggings
Hand stacked rock piles are another excellent indicator of historic mining activity. While mechanical mining methods could often be used in the major drainages, the smaller creeks and gulches that had limited water generally needed to be worked by hand. A miner had to manually dig down to bedrock to get down to the gold. Any rocks that were encountered in their digging needed to be moved out of the way and set to the side.
There are miles and miles of creeks and gulches that were worked by early-day placer miners. And the evidence of hand stacked rocks is one of the most notable indicators that they were there. These rock piles are generally still undisturbed.
Some prospectors have a hard time telling the difference between dredge tailing and hand placers diggings. The uniformity of the rock piles is the easiest way to tell. Hand stacking is less consistent and even. Dredge tailings are usually more uniform. Dredge tailings are more common on rivers, while hand placering was usually done on smaller creeks and gulches where a dredge could not be used.
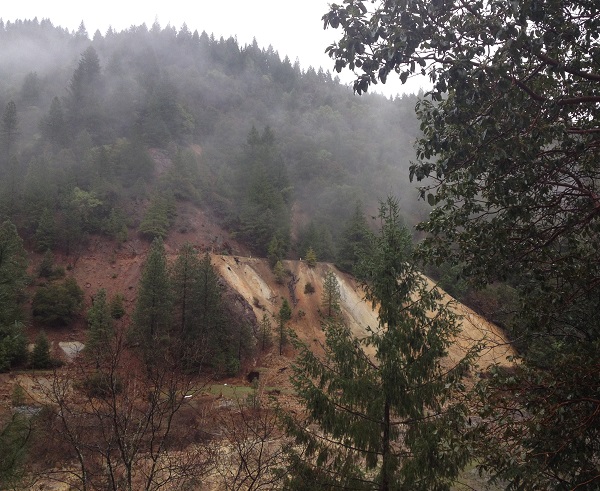
44. Hunt Hydraulic Pits
Hydraulic mining was done all throughout the world. It was most famously used in California back during the height of the gold rush. The miners literally washed away mountains with high pressured water to release the gold within.
On a smaller scale, hydraulic mining was used in pretty much all of the gold bearing states in the U.S. The practice was eventually banned because of the massive environmental damage that it caused which included serious erosion problems.
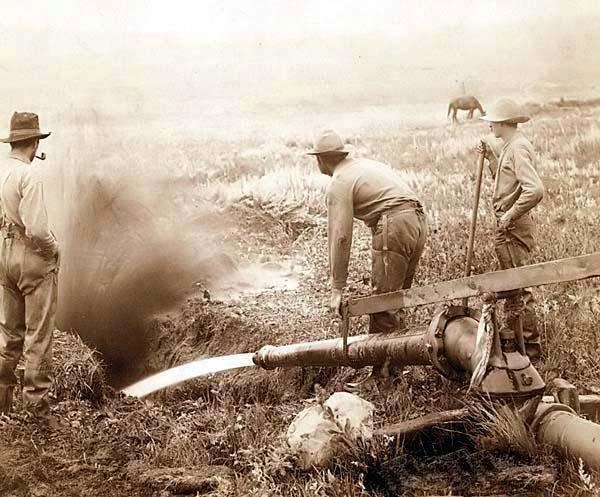
Huge steel cannons (called monitors) were used by miners to strip overburden and release gold. The slurry would then be run through a sluice box.
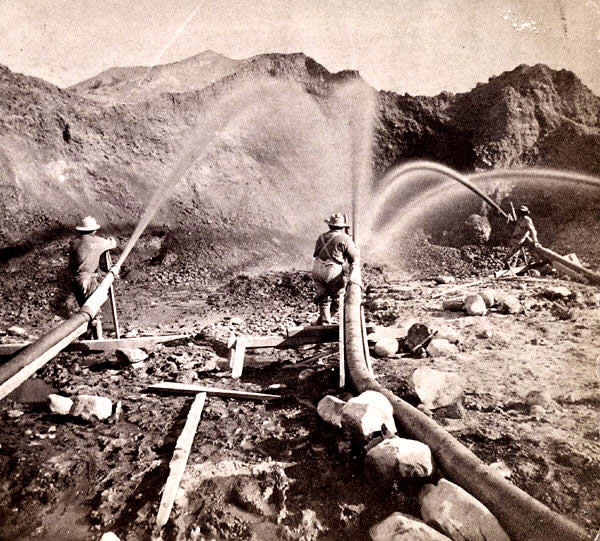
Some of thee old hydraulic mines were run by companies who hired crews of men to work around the clock. The amount of gold recovered was incredible, yet they still missed a lot of gold because of the crude mining methods during that time.
While this type of mining isn’t done any more, the hydraulic pits that were left behind are still visible today. The scars will remain on the landscape for thousands of years.
You can still find gold at these old hydraulic pits. Sometimes the gold that they were finding was very find and would be difficult to mine profitably without doing it on a large scale. Other operations did produce gold nuggets which can still be recovered today by metal detecting.
Just like all other forms of historic mining, there were inefficiencies with this practice and plenty of gold was missed.
45. Identify stamp locations and unprocessed ore
Stamp mills were used by hard rock miners to extract gold that was lock up in ores. They were a critical need at mines where the gold was only accessible after the rock was crushed.
Most stamp mills are long gone. They would either be moved from the mine once they were done extracting ore and move to another mine. Stamp mills that were abandoned have mostly been salvaged for scrap metal. You will find a few in museums or on display in old mining towns, but there aren’t many of them left in the hills.
The stamps themselves may be gone, but you can usually identify the areas where they were located because there will sometimes be crushed ore piles in the vicinity. If you are lucky, you might find some ore that was abandoned and never crushed.
Searching the old tailings with a metal detector can sometimes produce nice gold in quartz specimens.
46. Be on the lookout for discarded/lost/out of place ore
I have heard more than a few stories about piles of gold ore being found along trails and roadsides, far from any existing gold mine.
The theory is that miners were probably transporting their ore to the nearest stamp mill when their wagon broke down. Being loaded down with heavy ore, the miner unloaded their wagon and limped into the nearest town for repairs, never bothering to come back for the ore pile.
If you see a bunch of rocks that seem out of place and you are in gold country, it’s never a bad idea to scan it with a metal detector. You never know what you might find!
47. Prospect creeks and gulches around lode mines
Sometimes the creeks and gulches below lode mines were not placer mined by the early miners and show little evidence that they were worked historically. There is a tendency for people to believe that just because the early miners did not work an area it did not have gold, but this is certainly not the case.
There were good reasons that these places may have been overlooked. Lots of places just were not rich enough for the old-timers to spend any time at. In the mid 1800’s, a miner usually needed to recover at least ½ ounce of gold in a day of mining to be worth his effort.
Some of these areas can be found around old lode mines. The miners found a rich vein of gold in the hillside that was much more valuable to mine than the drainage below.
The other reason they may have overlooked the gulches was a lack of water. While the gulch may accumulate some gold, the lack of water made it uneconomical to mine. Today, a prospector using a metal detector or drywasher can find considerable gold in these dry areas that may have never been mined before.
48. Look for similar/unworked geological areas near lode mines
When hunting for a “virgin patch” of gold, one of the best methods you can do is to study the geology of the area, and explore areas that are adjacent to existing mines. You will notice that most of the mines in a given area are found in a certain rock type, and by exploring in nearby geology that is similar, you are more likely to find an area with gold.
It can definitely take some time and patience to find a completely undiscovered gold deposit. Even when you do everything right, you are going to strike out more often than not. However, with some patience and careful study of the productive geology of a given area, you might just find an undiscovered gold deposit that pays handsomely.
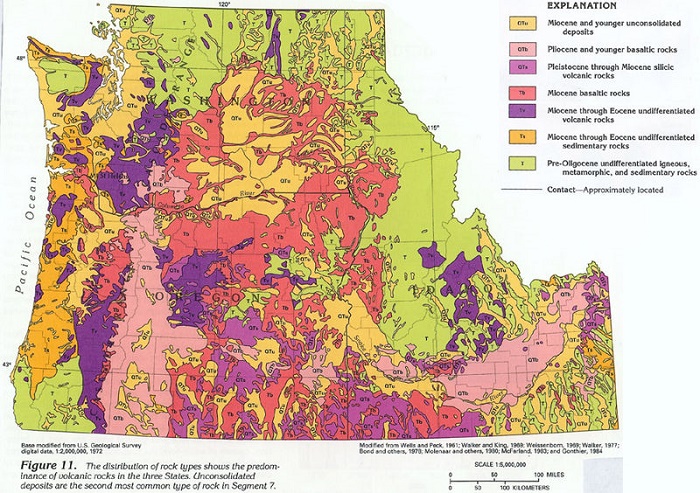
Studying geological maps can be a great way to find potential prospecting areas. Research the geology of known gold mines in your area and you will likely notice some trends regarding general rock type. State and federal government agencies have these maps and you can find them with a bit of research. Some are more general like this one, while others are very detailed and cover specific areas that will be of interest to you as a gold miner.
49. Explore the small prospects too!
Don’t overlook the little “pocket diggings” that you see when you are out prospecting. Pretty much every mining area has small diggings and “badger holes” that were made by early miners who were digging into the hillside in search of gold.
Usually when they were digging, they were following a vein or something that indicated that there would be some gold there. In many cases there actually was some gold, but there wasn’t enough to make it worth their while to keep digging, so they would abandon the location.
During the early days, a miner needed to find quite a bit of gold to make it worth their time, so even if they were finding a decent amount of gold they might abandon a location. Now that gold is over $1000 per ounce (check current gold price) these small prospects may be worth reworking.
50. Identify drywash piles and rework them
In the desert you will see old drywasher tailing piles scattered around in lots of places. Some of these old piles are still visible and are spotted because of their lack of vegetation.
Drywashers are notoriously poor at recovering gold sometimes. Even in the best of circumstances you will lose some gold with them. This is especially true with the old drywashers that were used by the depression era miners.
If they were drywashing then they were likely finding some gold, so it might be worth setting up and reworking some of these old piles. You might be surprised how much gold that they lost.
You can also give them a quick scan with a metal detector and recover gold nuggets. One methods is to use a rake and a sensitive VLF detector like the Gold Bug 2. Scan the top of the pile. Once you’ve searched it thoroughly, use a rake to take off a couple inches of material and then scan again. Repeat the process until you’ve gone through the whole pile. You’ll be surprised how much gold you can recover using this method.
51. Keep an eye out for relics, evidence of past mining
Mining relics are another great indicator that miners were in an area. Old cabins and shacks, lots of iron “rubbish”, and a variety of nails and miscellaneous trash are all signs that people spent time in an area. If they were there to mine for gold, then take time and explore the area yourself.
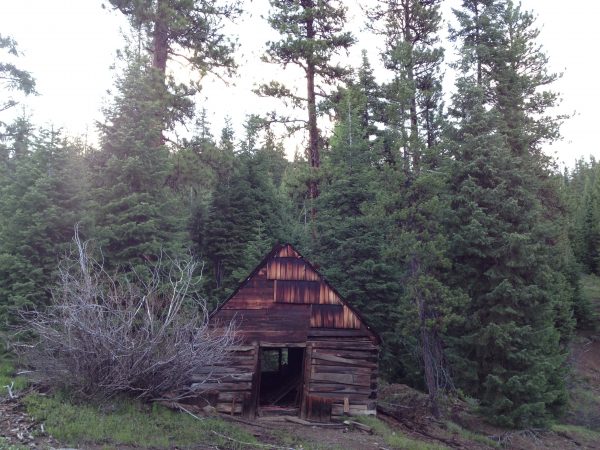
Old cabins in mining country are a good indicator that there’s probably some gold nearby.
Read: Metal Detecting for Relics in Old Mining Camps
52. Learn Different Placer Deposit Types
Gold is deposited in a variety of different ways. Taking the time to learn about the different processes that result in concentrations of gold will help you understand where to find it!
- Alluvial Placers – formed in river and stream sediment
- Eluvial Placers – formed by in-situ weathering (common in the desert environments)
- Residual Placers – a concentration of gold at or near its hardrock source
- Beach Placers – fine gold deposits found in beach sands
- Glacial Deposits – gold transported and deposited by glacial movement
- Flood Gold – gold moved during extreme flood events
53. Get Away from the Water’s Edge
Gold isn’t just found under water. Sometimes the richest concentrations of gold are found in bench deposits that are nowhere near the current river.
One of the best things about bench deposits is that they are sometimes completely ignored by other prospectors. Everybody thinks that they will find the most gold at the edge of the water so they completely overlook the benches behind them. Those old channels might be way richer than the river itself.
54. Find Ancient Rivers
Ancient rivers are a lot like bench deposits. They are places where the river once was, but has since eroded and cut its way downward to its present location. I generally think of bench deposits being in the nearby vicinity of an existing river channel, whereas an ancient river can be miles away from an existing river.
The principle differences are the same; it is the timeline that is different. Bench deposits might be a few million years old, or they may be as recently exposed as last season after a large snow melt left an existing bench high-and-dry.
Ancient rivers that are gold bearing are often from the Tertiary time period, and could be several hundred million years old!
Ancient river channels are sometimes found hundred or even thousands of feet above the closest existing river. In places like the Sierra Nevada’s of California, where there was considerable geologic uplift, these channels are very commonly found literally up on the side of mountains.
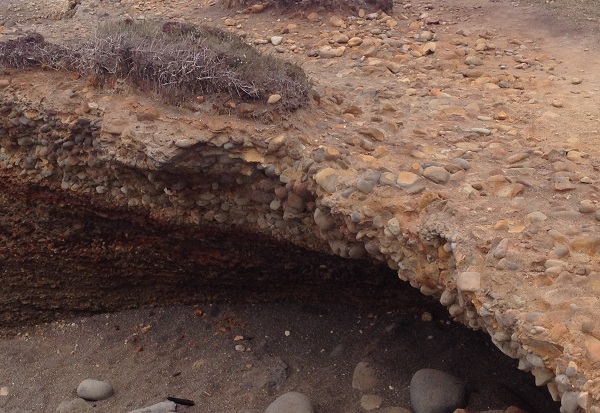
See those round rocks? This is an old river channel. It is now about 80 feet above the current water line.
Sometimes these ancient rivers were gold-bearing, and mining them will result in good gold.
The easiest way to spot an old river channel is to look for smooth, water-worn rocks. Round smooth rocks and gravel are common in rivers where it has tumbled smooth over time, but you don’t often see it up on the side of a mountain. If you do, you’ve probably found an old channel.
Study the old mining reports and you will often see that many profitable mines were actually working old channel. Most of the hydraulic mines in the California Mother Lode were breaking apart old river channels to release gold.
55. Find Glacial Outwash areas
Many are actually surprised to learn that gold is found in the Midwest and Northeast. While these aren’t traditionally the richest gold mining areas of the U.S., there is still gold to find here.
The source of the gold is different through. It doesn’t come from nearby veins that erode and deposit into the rivers and streams. Instead, the source of the gold actually comes from Canada and is brought down by glaciers.
Yes, glacial gold deposits are actually found in pretty much all the states in the northern half of the U.S. As various ice ages occurred over the millennia, glaciers moved southward, pushing down rocks and ore from Canada. As the glaciers would recede these rocks would be deposited in random locations of glacial outwash.
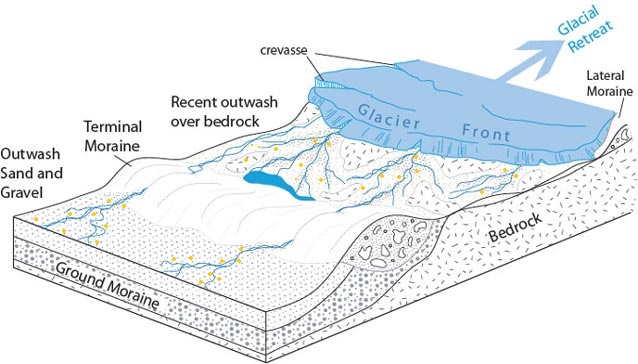
Glaciers brought gold-bearing ores south from Canada. As the glaciers receded, these ores were deposited. This is the source of most of the gold found in the Midwest and Northeastern U.S. Glacial action usually pulverized the ores and left only fine gold dust.
It is possible that large rocks and ore could have been brought down, but the violent action of ice pushing south actually pulverized the rocks. Any ore that did contain gold was obliterated into the tiniest of pieces.
The glaciers would recede and the pulverized bits of gold were left behind, being concentrated in waters by natural erosion. The result is small concentrations of tiny gold dust particles that can be found all over in parts of the U.S. where you wouldn’t traditionally expect to find gold.
These gold deposits are usually sporadic and limited. Don’t expect to get rich mining these places, but you can definitely find some gold in places that most people have no idea that it even exists.
56. Find Gold at the Beach
There are several locations where gold can be found in beach sands. The richest beach placers on Earth were found in Alaska. Others rich discoveries have been made in Oregon and Washington.
These are tiny, almost microscopic bits of gold that are found within fine textured sand. The gold may be small, but there are large quantities of it in some places and it has actually been mined profitably. The most famous locations are the beaches of Nome, Alaska.
Finding beach gold can be challenging. The best indicator to look for is black sands. The gold will be most highly concentrated within the streaks of black sand.
The tricky thing is that the streaks of black sand will move around with the tides, so a place that is very productive one day might be poor the next.
The gold found on beaches is always small, so specialized equipment will help you recover more gold. Even gold panning can be challenging and you will probably lose some gold unless you are an extremely skilled panner.
The Gold Cube has become one of the favorites to use by beach miners. Sand can be fed directly into the head of the cube and you will get good gold recovery if you set it up properly. You should also classify the sand to make sure there aren’t any rocks, seashells, wood, or other debris. Running larger material through the Gold Cube will increase losses of gold considerably.
Most ocean beaches also have some gold deposits that are above the existing water line. These were ancient placers that are sometimes will above the high tide line.
These ancient beach deposits were mined quickly in most areas, and the profitable deposits have mostly been worked out. The old-timers missed quite a bit of gold though, and you can still recover some decent gold if you find a good spot.
Just remember, the gold is going to be tiny, so I highly recommend you use specialized equipment if you want to be successful.
More articles about recovering fine gold:
How to Prevent Fine Gold from Floating out of your Pan
Classify your Gravels to Retain More Fine Gold
57. Consider the coarseness of gold you are finding
What the gold you are finding looks like can be an indicator for where it comes from and how far it has traveled. If you are panning smooth, water-worn nuggets, there is a good chance that it has traveled a good distance. If you are finding rough, jagged textured nuggets, it probably hasn’t traveled too far from its source. Move upstream and try to pinpoint where to gold is originating from… there is a good chance that you may find a very rich concentration of gold.
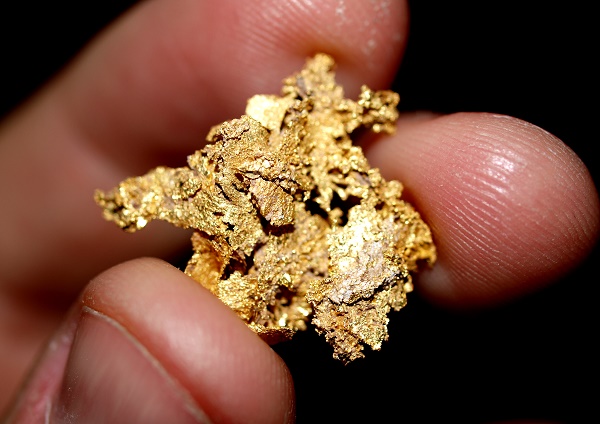
This gold nugget hasn’t traveled far from its source, as evident by its jagged texture. This was part of an eroded gold vein that produced several ounces of gold for one lucky prospector!
58. Learn to Recover Fine Gold
Most small scale prospectors try to find their gold in streams that have a history of having it found in them. The age old technique of panning for gold is still the most common method of prospecting done but there are also those that use larger equipment such as sluices, dredges and drywashers. If the equipment is laid out correctly and then used properly, then these methods are great at separating the lighter materials out and capturing some gold if it is present in the gravel you are running.
These captured gold particles are generally very small in nature and usually will consist of gold flakes or gold dust.
Black sand has been a challenge for prospectors for as long as man has been looking for gold. Luckily, we have some tools today that make it much easier to separate it from the gold. Specifically, we have some equipment that was designed specifically to deal with this challenge.
Some of this equipment is mostly designed for final separation of gold from concentrates, while some can have material the material that you are digging added directly to them.
I will say again, classifying the material you feed into any type of equipment is going to increase your fine gold recovery rates.
59. Crush Ore Samples for Free Gold
Most prospectors today spend most of their efforts searching for placer gold, but some prospectors specialize in hard rock mining and searching for valuable gold ores.
The first thing to understand is that it takes a trained eye to identify actual gold ore. Most “shiny rocks” that people find are not gold (here are some pictures of real gold). I have had literally hundreds of people email me their pictures of rocks (usually containing mica, pyrite, or other types of fool’s gold) thinking they had struck the Mother Lode.
You don’t just look at a rock and guess whether it’s gold or not. If you seriously want to figure it out then you need to crush up your ore and pan it out to see if there is any gold in it!
Most small-scale prospectors should focus their interests on free-milling gold. This is gold that is large enough to show visible “colors” when an ore is crushed up. There are lots of gold ores out there that contain gold that is so small that it’s invisible. Some of the richest gold mines in the world mine this type of gold, but they have the proper equipment needed to extract it. This type of gold ore is generally not profitable for the average prospector to focus on.
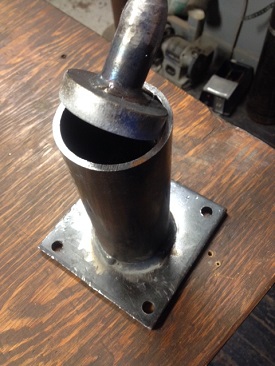
Focusing on high-grade, free-milling gold is the best bet for most prospectors. You can get a good quality mortar and pestle to crush up small specimens and examine them for gold. These are small and can easily be put in a backpack, or you can bring home small ore samples and crush them at home. Just make sure that you take careful records of where you collected your samples.
If you do happen to find a large amount of ore that is auriferous then there are larger commercial rock crushers that you can use.
After your ores are crushed into a fine dust, then you can use any sort of gravity separation method to capture the gold. A simple gold pan will work just fine to check small samples.
Processing ore and extracting gold is much more labor intensive than placer mining. So you are going to need to find a very rich ore to make it worth your effort, especially if you don’t have access to commercial equipment.
60. Look for “dirty” quartz
It is pretty common knowledge that gold is sometimes associated with quartz. The often run together, and it is not uncommon to see nice quality gold/quartz specimens that prospectors have found. They are most often found by prospectors using metal detectors.
While quartz and gold definitely have a common association, sometimes people give it more attention than it actually deserves to get.
Quartz is one of the most abundant minerals on Earth. There are thousands of places where quartz is found that no gold has ever been found. So just because you find quartz it doesn’t mean that you will find gold there.
If I am in gold country, I will still pay some attention to quartz because I already know that gold occurs in the area.
I have found that very clean, white colored quartz is generally less productive than dirty, iron-stained quartz. I find a lot more gold in the dirty looking quartz than I do in clean, white quartz.
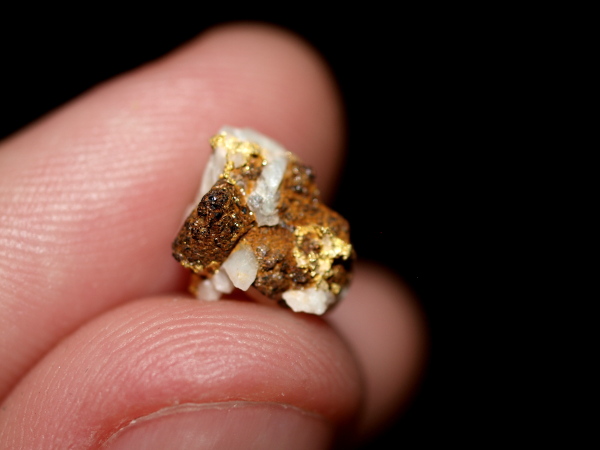
I find more specimens like this one (dark with iron staining and other matrix) than I do with just gold and white quartz.
Of course this isn’t a rule set in stone, and there are certainly exceptions. One of the most famous gold mines in California is the Original Sixteen to One Mine, which mines rich gold veins that run through pure white quartz.
Remember, if you happen to find a specimen of quartz with visible gold veins running through it, it is usually a good idea to keep it as-is rather than crushing it. Collectors will usually pay a nice premium for these pieces.
For most prospectors, a good quality VLF metal detector is the best tool to use if you want to find a gold in quartz specimen. You want a good quality detector that is designed for finding small gold, since gold veins are usually very thin it takes a specialized detector to find them. These detectors will give you an advantage that the early miners definitely didn’t have. Scanning old mine tailing piles can produce some amazing results.
61. Go Prospecting After a Storm
Gold deposits in creeks and rivers are replenished after large storms. Heavy rains cause erosion of soils along the hillsides, which move gold down into the river.
This type of replenishment occurs every spring in most areas. Normal snowmelt and spring runoff is a natural even that releases gold. It was millions of years of this process that made the tales of riches so impressive during the early gold rushes.
Even one large storm can make a noticeable difference in the amount of gold found though. You’d be surprised how much gold can move around after one large high water event.
Flash flooding in the desert is a good example of this. While a dry wash might go relatively undisturbed for years and years, one massive flash flood can cause considerable changes to a wash. Not only does it add gold from the surrounding hillsides, but it also exposes fresh bedrock and will release gold that has been hidden under overburden.
Keep this in mind the next time someone tells you that “all the gold has been found already” or that an area has already been “mined out.” The natural processes of erosion make it so an area is never fully depleted of its gold.
62. Learn the Difference between Real Gold and “fool’s gold”
There are dozens of minerals on Earth that are shiny and have a silvery-gold color. Most of them are worthless.
Check out these pictures of real, natural gold nuggets and specimens.
Once you’ve seen real gold and held it in your hand, it’s hard to mistake it with any other mineral. These nuggets come from Colorado, Nevada, California, Australia, and Arizona. They all look a little different, but there is no doubt that it’s real gold.
99.9% of the time, when someone (who isn’t a gold prospector) thinks they have found gold, they have actually found some sort of “fool’s gold.” Most commonly it is mica or pyrite.
There are a some very simple ways to tell the difference based on specific gravity and hardness of the minerals, but you should also learn to identify what real gold looks like. In my opinion, once you have actually seen real gold, it’s pretty hard to mistake it.
If you’re still having some trouble telling the difference, then you can do some simple tests.
Gold is heavy. Pyrite and micas are very light. If you are panning and find that these shiny specks are easily lost out of your gold pan, then you probably don’t have real gold. Fool’s gold will get mixed in with sand and won’t concentrate at the bottom of the pan.
The color is also very different. Most types of fool’s gold has a brassy, shininess to it. If you take it out of direct sunlight the gold color will go away. Gold looks gold regardless of whether it’s in the sun or not.
Gold is a very soft metal. A pocket knife will scratch it. A large piece can be flattened out. This is not the case with mica and pyrite. They are brittle, and will fracture into smaller pieces.
63. Market Your Gold Properly for the Most Money
It is surprising that marketing gold is actually difficult for many gold prospectors. It’s not hard to find a buyer, but finding a buyer who gives you a fair price can be very challenging.
Your options of where to sell will vary depending on where you live. In some countries, you are legally required to sell to the government and they will only offer you a fixed price for your gold. You won’t have many options.
In the U.S. you can sell the gold to anyone you want. There are lots of people that will buy it, but most of these buyers won’t give you anywhere near what it is actually worth.
First you need to set your expectations. Remember, gold that you mine from the ground isn’t pure. It is likely somewhere between 18k and 22k in purity. So if you are selling to someone that is going to melt your gold then you will lose 15-25% of the weight right there.
Also consider that whoever you are selling to needs to make a profit. Here is where the buyers will vary considerably. If you sell to a pawn shop or cash-for-gold type business then you should expect to get just a fraction of the value. Unless you are absolutely desperate, these should be your last option.
Refineries are a good option if you have a decent amount of placer gold to sell. They will almost always pay better than pawn shops or other buyers. However, they have lots of fees to consider, so do your research. Payouts will vary and not everyone trust refineries to be honest about their payouts or results from their assays.
Selling to a collector is a good option for most miners. Placer gold, gold nuggets and gold specimens have collectable value that will actually bring a better price than just the gold content. Fines and dust aren’t worth much of a premium, but nice sized nuggets and specimens are definitely worth selling separately.
Jewelers might be interested in buying your gold nuggets, but they are going to be selective. Gold nugget dealers are also a good option because they market the gold to collectors and aren’t just going to melt your gold down.
Whoever you sell to, make sure that you don’t get yourself in a situation where you absolutely need to sell. If you are desperate to pay the bills with your gold money then you won’t have the time to seek out the best offer and you are likely to get a lousy deal.
64. Get specific gravity of your specimens to determine value
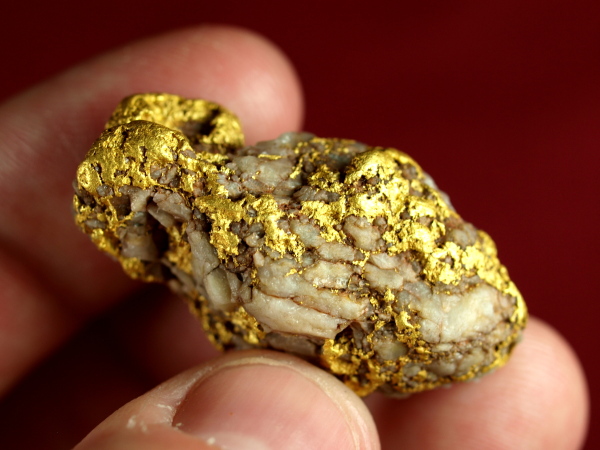
Nice specimen! How much gold do you think it has in it?
If you find a nice specimen of gold in quartz, you need to find out how much actual gold is in the piece. If it is good sized and attractive, then there is a good chance that it is worth more to a collector than if you were to crush it and melt it, but it is still a good idea to figure out exactly how much gold is in it.
To do this, you need to do a specific gravity test. This involves getting a “dry weight” and “wet weight” of the specimen suspended in water. With this information, you can determine the gold content within your specimen. The calculations to do this are fairly straight forward, and if done correctly you can get a fairly accurate assessment of the gold content.
There are some pretty handy calculators online that will help you do this. They aren’t 100% accurate, but they are pretty close.
65. Clean your nuggets for the best price to collectors

Sometimes gold nuggets come out of the ground dirty and grimy. They can have caliche and other material covering the outside of them which covers up the natural beauty of the gold.
They are going to be much nicer for display if you clean them up. Plus, you will need to clean them up if you want to sell them.
Gold that you pan out of a river is usually nice and polished. The natural erosion that occurs in the river cleans up the nuggets. They will be nice and shiny and probably won’t require any additional cleaning.
The gold nuggets that you find with metal detectors and drywashers are a different story. The can come out of the ground very dirty and grimy. They usually need to be cleaned up.
Cleaning gold nuggets is actually pretty simple. I recommend that you do the minimum amount of cleaning needed to expose the gold and no more. Too much cleaning can actually detract from the nugget, making it too shiny.
Often, just a light soak in some dish soap and water and a scrub with an old toothbrush will do the trick.
Another tip is to soak the nuggets in a bottle of white vinegar and salt. Add enough salt so that it accumulates in the bottle. Soak the nuggets for a few days, occasionally shaking the bottle. The salt will act as an abrasive that will scrub the nuggets, and the vinegar help to break down any grime.
A simple ultrasonic cleaner used for cleaning jewelry can work really well also.
Sometimes a nugget will just be too grimy and dirty to clean using the above methods, and an acid is needed. In these cases, I recommend a product called Whink. It is a household cleaning product with some acid in it that will break up even the heaviest stains. Wear glove if you use it because its some pretty nasty stuff. It will definitely do the job though.
66. Make jewelry with your gold nuggets
Sometimes you find a nugget that just seems perfect to be made into a pendant or some other type of jewelry. In many cases, you can make a bit more money from your nuggets by using them in jewelry.
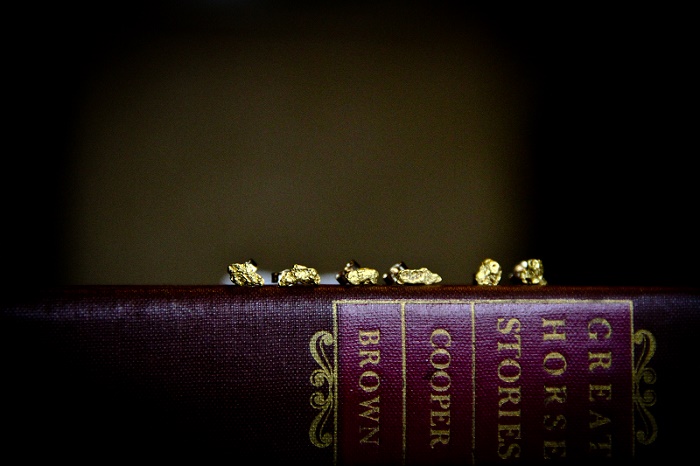
Some natural gold nuggets made into some lovely stud earrings.
This was especially true back when gold was only a few hundred dollars per ounce. Now that the price of gold is high, turning your nuggets into jewelry may not increase the value as much as it once did. Some nice pieces are better left as-is and sold to collectors rather than turning them to jewelry.
Still, if you do a good job and select the right pieces, turning your gold nuggets into jewelry can increase their value significantly.
67. Don’t do this full-time
There are very few prospectors (even very successful ones) who have been able to make a full-time living from gold mining. Mining is a very challenging business to get into. Particularly if you decide to scale-up your mining operation, you will have to deal with added regulations and costs.
There are certainly some people that have made it work. If you find a good gold deposit, you can certainly work it profitably if you know what you’re doing.
Some who have been successful at making a living are seasonal prospectors. They have a “regular job” during the winter and then prospect during the spring, summer and fall.

Anyone who says gold mining is easy probably hasn’t actually done much of it…
Some prospectors travel with the weather. They spend their summer months prospecting in Washington, Idaho, Oregon, Montana, or Northern California. Then when the winter hits they head south to Arizona.
This isn’t an easy existence though. I only know a couple guys that have actually been able to make it work. Most of them are living pretty “rough,” sleeping in an old camper and always on the move trying to find that next piece of gold.
For most people I would say that prospecting is a great hobby, or even a side-business, but don’t expect to make a full-time living as a gold miner. Very few people are able to do it. Plus, needing to pay the bills with your gold finds really takes the fun out of it. I recommend that you consider gold prospecting as a part-time endeavor.
68. Don’t buy a gold claim sight-unseen (or unworked!)
The increase in gold price over the past decade has meant that there are a lot of people out there selling mining claims. Some of these are legitimate claims that would be worth purchasing, but I’d guess that most of them are nearly worthless.
Basically, some snake-oil salesman is selling worthless claims to uneducated buyers.
Don’t buy a mining claim if you don’t know anything about mining. You need to learn to crawl before you can walk, and spending thousands of dollars on a claim when you don’t know the first thing about gold mining is a fool’s errand.
Yet people do it every day. They equate a gold claim with finding gold, and assume that any claim will have gold.
Ask yourself and the claim seller a few questions.
Most claims nowadays are being sold by people who are merely “flipping” them. They have never even prospected on the ground, and I suspect they don’t even know anything about gold mining. They are simply acting as a broker and collecting your money in the process.
A much better idea (especially if you are a beginner) is to join a prospecting club in your area. They often have club claims that you can prospect on once you are a member.
Also, understand that you don’t actually need to own a mining claim to prospect for gold. There are thousands of acres in nearly every western state that is open to prospecting. Is this news to you? Then you definitely need to learn more about prospecting and mining claims before you even think about buying one.
There are certainly some valid claims out there for sale. Some of them could undoubtedly be mined profitably and are worth the purchase price, but you need to learn how to recognize them among the sea of worthless claims out there.
69. Stake (or don’t) your own claim
If you find a rich gold deposit, it may be in your best interest to stake a claim on it. A claim will give you exclusive mineral rights to the area, meaning that you are the only one who can mine there as long as you keep it active.
There are a lot of misconceptions about mining claims. A claim is NOT private land. You cannot exclude the public from being on your claim. People can still hike, camp, hunt, fish, or do any number of things on your active mining claim. The only thing they can’t do is remove minerals.
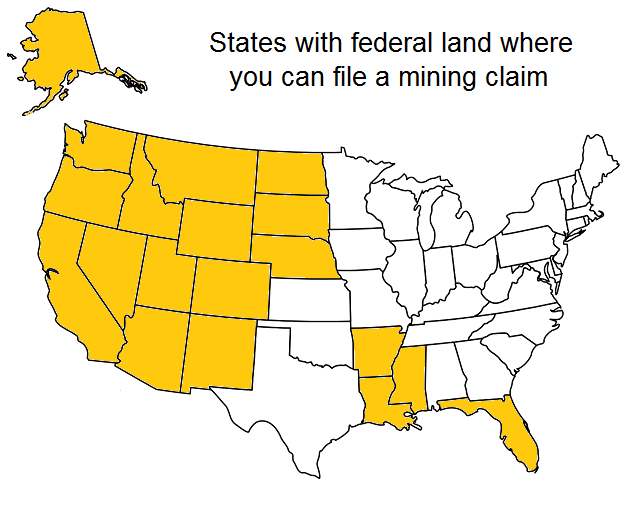
There are 19 states in the U.S. with federal land that you can file a mining claim. Realistically, about 13 of those states have gold that could be profitably mined.
If you have found a significant deposit that you could mine for several years, staking a claim is a good idea. Other times, you might find an area with some gold but the general area doesn’t seem to be very rich. You can still mine here, but you might not want to bother with staking a claim.
Sometimes staking a claim only calls attention to an area that has been overlooked previously, and you might experience issues with “high graders” sneaking onto your claim when you aren’t there to mine. Sometimes it is best not to stake a claim, and just quietly and discretely work the area.
Read: How to Stake a Mining Claim on Federal Land in 8 Simple Steps
70. Don’t always believe assay reports
Many people selling mining claims will provide assay reports, both recent and historic, that show that an area is exceptionally rich. Just looking at the assay report, you would expect that the gold mine was loaded with gold.
Assay reports are notoriously inaccurate. Properly sampling a mine to get an accurate assay actually needs to be done carefully, because there is always a tendency for the mine owner to “high grade” and select only the richest pieces of ore to send off to be analyzed, rather than a comprehensive sampling of the surrounding ores.
This creates a highly skewed and unrealistic view of the total value of a mine. By testing only the best looking ores, the results will often show (inaccurately) that the ore is valued at several ounces per ton, which would be a very rich gold mine indeed.
Unfortunately, when only select samples are tested instead of a comprehensive test of all the ore, it creates an inflated richness that is not reflective of the mine itself.
Buying a mining claim is always “buyers beware.” Never take an assay report as definitive proof of the mines richness.
71. Keep quiet about your gold finds
I think every gold prospector who has been at this for a while can relate to having someone else find their “secret spot” after they told someone about their find. There’s nothing quiet as frustrating as telling someone else the good news about a recent gold discovery, only to have that person tell others about it, or to go in the area and look for gold themselves.
Most smart prospectors have learned to keep quiet when they find gold. Some even go as far as to only mine at night when people won’t see them.
Keep quiet about your gold discoveries until you have thoroughly worked the area.
72. Don’t listen to just anyone (armchair experts)
I will be the first to tell you that listening to others with extensive gold mining experience is one of the best ways to become successful yourself. There are lots of “old timers” out there who have a lifetime of experience. Take advantage of that knowledge. When they speak, listen.
Having said that, I have also heard lots of advice from so-called “experts” when it comes to finding gold. To be honest, I don’t think these folks have actually found much gold, yet they are always quick to tell you their opinions and advice. I have heard some pretty interesting “tips” over the years from these folks.
I guess the point here is to always take peoples advice with a grain of salt. Ask yourself if the person teaching you how to find gold has actually found some themselves.
73. Pay to Prospect
If you are new to prospecting and just want to go out and find some gold without having to worry about land ownership or claim status, in gold-bearing areas there are often pay-to-prospect places where you can pay a small daily fee and get access to proven gold claims. If you are just a casual prospector and simply want to go out with the kids and have some fun panning for a little gold, these places are just fine.
74. Have ridiculous amounts of persistence
Persistence and hard work are both keys to success when you are prospecting for gold. Finding gold isn’t easy. Even in very rich areas, sometimes you may go for days or weeks without finding any gold at all. This can be extremely frustrating, and many newcomers to this sport have given up because it was just too hard to find anything.
In addition to learning as much as you can about how to find gold, the simple truth is that on some days even the most skilled prospectors have a hard time finding any gold. For example, I know several metal detectorists who routinely find a pound or more of gold every season. Yet, they will often go for several weeks at a time when they don’t ever find a nugget. Being persistent and having a positive attitude will increase ultimately be your key to successful prospecting.
75. Join a Prospecting Club
Joining a gold prospecting club is a great way to learn how to find gold as well as meet fellow gold prospectors in your area. Clubs are filled with like-minded individuals and you can learn a lot from these people.
Many clubs also have claims that can be used by members, and this can be one if the easiest ways for a beginner to gain access to gold-bearing ground to prospect.
76. Learn from real experienced prospectors
Take the time to listen to those “old timers”. They usually know a thing or two about finding gold!
It is common these days to run across beginners to any hobby that thinks they know it all. They get excited about finding gold and start digging, panning and sluicing without much thought to what they are actually doing. The result is usually very poor, with little gold to show for their efforts.
Experience prospectors learn to take their time and think about what they are doing and where to search for gold. And many of them will be happy to share some of their knowledge. You just have to be smart enough to ask!
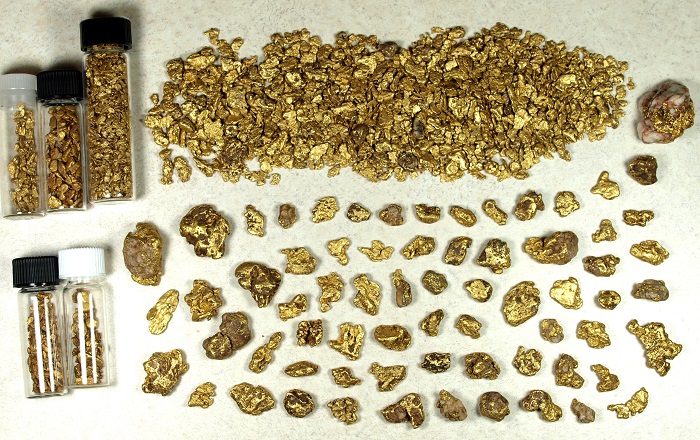
Finding gold like this doesn’t happen by accident. Those old-timers might be able to teach you a thing or two. When a successful gold miner starts talking, remember to listen.
77. Learn and Understand your mining rights!
Our rights as small-scale miners are continuously under attack from environmental groups, who try and prevent our access to areas.
In the United States, our right to prospect and mine for precious metals is protected by the General Mining Act of 1872. Yet, environmental groups use a variety of tactics to prevent us from mining by limiting access to certain areas, preventing the use of certain types of equipment, and using unsound science to ultimately limit or prevent miners access to the resources of the land.
I would highly encourage any gold prospector to educate themselves on their rights, and join clubs and associations who fight to defend the rights of the small-scale miners!
Conclusion
I hope this article has been helpful to you. I tried to go a little bit beyond the basics with some of these tips to really give you an advantage in your search.
Finding gold consistently is take much more than just knowing how to pan for gold or run a sluice box. Yes equipment is important, but actually knowing where to dig is what will really make you successful.
Keep in mind that the places where gold is found is entirely dependent on the geology of the area, so you’d better learn a little bit out that!
You should also remember that there have been prospectors scouring the deserts and mountains for a couple hundred years now. Most of the major gold districts have been found already, so researching and finding these historic gold mining areas is a must.
Once you’ve found a gold-bearing area, now the fun begins! Select the right equipment for the job and start mining. Keep at it and you will be successful.
Happy prospecting!